Thursday, January 29, 2015

Automating your Azure infrastructure with Runbook management

With Azure automation, it’s now very easy to automate all your long running manual tasks that are repetitively executed in the Azure infrastructure with the help of PowerShell workflows that results in less errors in a better managed way. You can automate the creation, monitoring, deployment, and maintenance of resources in your Azure environment using the Azure Automation solution for Azure.

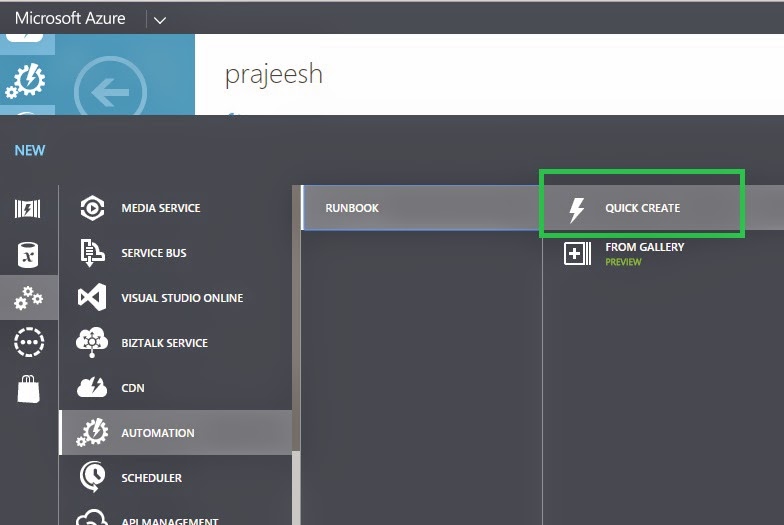
To create a runbook, you need to first create an Automation account on the Azure portal.
After creating the automation account, click on the account and select Runbook from the dashboard

Click New and create a runbook with a title and description as given below

This will open the runbook edit workspace on the portal.

Automation runbooks are implemented as Windows PowerShell workflows. As you can see from the editor window, the workflow starts with a workflow keyword followed by the name of the workflow. You can add parameters and script to the body as in any other PowerShell cmdlet. In this example, I’ve just used a string parameter to get an input from the user and used a Write-Output to output a message.

Click on Test button on the bottom panel to test the runbook in the same window.

Once tested and saved, you can publish the workflow by clicking the Publish button


Click Start to invoke the workflow
Provide the values for parameters and click OK.

Once the workflow has started you can track the progress and result on the Job tab as given below

Wednesday, January 21, 2015

Creating your own unit test framework for PowerShell - Part 6


The authorization manager helps control the execution of commands for the runspace. When you try to execute a PowerShell script from C#, and haven't changed PowerShell's default execution policy, the scripts that are executed under the execution policy set on the machine. If you want the tests executed from C# to bypass the default security policy, then you need to either use a null AuthorizationManager implementation for the runspace or create a custom implementation of the AuthorizationManager and override the policy based on any condition you have. Deriving from the AuthorizationManager class allows you to override the ShouldRun method and add the logic specific to your needs like set up a reason parameter with a custom execption with proper explanation and details on why this command was blocked etc.
In the testing framework, I decided to use the second approach and created the custom authorization manager implementation as

internal class TestContextAuthorizationManager : AuthorizationManager
{
    public TestContextAuthorizationManager(string shellId) : base(shellId)
    {

    }

    protected override bool ShouldRun(CommandInfo commandInfo, CommandOrigin origin, PSHost host, out Exception reason)
    {
        base.ShouldRun(commandInfo, origin, host, out reason);
        return true;
    }
}

In the LoadPSTestHost method you can now use this implementation instead of the default AuthorizationManager as
var state = InitialSessionState.CreateDefault2();
state.AuthorizationManager = new TestContextAuthorizationManager("VSTestShellId");

Monday, January 19, 2015

Creating your own unit testing framework for PowerShell - part 5


PowerShell cmdlets and modules can report two kinds or errors (Terminating and non-terminating). Terminating errors are errors that cause the pipeline to be terminated immediately, or errors that occur when there is no reason to continue processing. Nonterminating errors are those errors that report a current error condition, but the cmdlet can continue to process input objects. With nonterminating errors, the user is typically notified of the problem, but the cmdlet continues to process the next input object. Terminating errors are reported by throwing exceptions or by calling the ThrowTerminatingError method, while non-terminating errors are reported by calling the Write-Error method that in turn sends an error record to the error stream.
To capture all the non-terminating errors you have to probe the PowerShell.Streams.Error collection and collect the details of the errors. While terminating errors are throw as RuntimeException and can be handled at the catch block.
In our framework, I’ve extended the FunctionInfo object to expose a property to capture non-terminating errors and also provided an option to expose the non-terminating error as a RuntimeException if needed by using the FailOnNonTerminatingError method.
public PsHost FailOnNonTerminatingError()
{
    _failOnNonTerminatingError = true;
    return this;
}

The implementation for the handle errors looks like
private string HandleNonTerminatingErrors(System.Management.Automation.PowerShell shell)
{
    var errors = shell.Streams.Error;
    if (errors == null || errors.Count <= 0) return String.Empty;
    var errorBuilder = new StringBuilder();
    foreach (var err in errors)
    {
        errorBuilder.AppendLine(err.ToString());
    }
    if (_failOnNonTerminatingError)
    {
        throw new RuntimeException(errorBuilder.ToString());
    }
    return errorBuilder.ToString();
}

Now in the code, you can use the test methods as.
[TestMethod]
[ExpectedException(typeof (RuntimeException))]
public void Tests_PsHost_FailOnNonTerminatingError_ThrowsNonTerminatingErrorsAsRuntimeExceptions()
{
    PsHost<TestModule>
        .Create()
        .FailOnNonTerminatingError()
        .Execute("Invoke-NonTerminatingError");
}

Next we’ll see how to overcome the execution policies in the unit test context without altering the PowerShell environment policies.

Sunday, January 18, 2015

Creating your own unit testing framework for PowerShell - part 4

Before we proceed into how we can stub out commands in our test framework, we’ll see how the AddScript method works and how to use it to execute a script block in powershell. The AddScript method adds a script to the end of the pipeline of the PowerShell object and can be invoked by the Invoke method. We’ll use this method to add our dummy function as a script object to the pipeline so that when this command is called later from a function, it’s going to call the dummy function that was added using the AddScript method.

So our Stub() is implemented as.

public PowerShellHost Stub(string method)
{
    if (_runspace == null)
    {
        throw new ArgumentException("The PowerShell host should be setup before invoking the methods");
    }
    var script = String.Format("Function {0} {{}}", method);
    _shell.AddScript(script).Invoke();          
    return this;
}

You can also see that I’ve used the return value of the method as the PowerShellHost, so that I can use a fluent interface model for my test methods. A sample test method using Stub to the Write-Host command can be written as

var psHost = new PowerShellHost<XModule>();
var actual = psHost
    .Stub("Write-Host")
    .Execute("Get-Greetings");

var result = actual.GetGreetings.Result.Select(psObject => psObject.BaseObject).OfType<string>().First();
Assert.AreEqual<string>(result, "Hello from VSTest");


Next we’ll see how exception handling can be taken care.

Creating your own unit testing framework for PowerShell - Part 3

The windows PowerShell engine can be hosted in the System.Management.Automation.PowerShell class. Using this class you can create, execute and manage commands in a Runspace. We’ll use these features of the PowerShell class to load and execute our Modules and interact with the PowerShell engine whenever needed in our unit test framework. While creating the PowerShell host for our test framework, it’s good to define the Runspace that is responsible for the operating environment for command pipelines. In our framework I preferred to use the constrained runspace which will allow us to restrict the programming elements that can be applied by the user.
We’ll later use this ability of constrained runspaces to simulate a Stub behavior in our test framework. To restrict the availability of aliases, applications, cmdlets, functions and scripts, we’ll create an empty InitialSessionState and use that for creating a runspace. Later we’ll use the AddPSModule, AddCommand, AddPSSnapin methods to include the required functionality in our runspace in a text context.

InitialSessionState has three different methods to create a container that holds commands
  • Create - Creates an empty container. No commands are added to this container.
  • CreateDefault - Creates a session state that includes all of the built-in Windows PowerShell commands on the machine. When using this API, all the built-in PowerShell commands are loaded as snapins.
  • CreateDefault2 - Creates a session state that includes only the minimal set of commands needed to host Windows PowerShell. When using this API, only one snapin – Microsoft.PowerShell.Core - is loaded.

We’ll use the CreateDefault2 overload method to create the InitialSesionState instance.

private InitialSessionState CreateSessionState(string path)
{
    var state = InitialSessionState.CreateDefault2();
    if (!String.IsNullOrEmpty(path))
    {
        state.ImportPSModulesFromPath(path);
    }
    return state;
}

In the CreateSessionState method, we use the Path property of the PSModuleAttribute created in the part 1 of this series to load all modules from the path provide to the InitilSessionState.

Once we have the InitialSessionState, we’ll use this container to create the Runspace and then the PowerShell host

_runspace = RunspaceFactory.CreateRunspace(state); 
_runspace.Open();
_shell = PowerShell.Create();
_shell.Runspace = _runspace;

We’ll use this PowerShell instance to execute the commands needed from the module. In the framework, I have my execute method created as

public TModule Execute(string method)
{
    if (_shell == null)
    {
        throw new ArgumentException("The PowerShell host should be setup before invoking the methods");
    }
    _shell.AddCommand(_moduleInfo.Name + @"\" + method);
    var methodProperties = typeof(TModule).GetProperties()
        .Where(prop => prop.IsDefined(typeof(PsModuleFunctionAttribute), false)).ToList();
    var property = methodProperties.First(p => p.GetCustomAttribute<PsModuleFunctionAttribute>().Name == method);
    var commandInfo = property.GetValue(_module) as PsCommandInfo;
    var parameters = commandInfo.Parameters;
    if (parameters != null)
    {
        _shell.AddParameters(parameters);
    }
    var results = _shell.Invoke();
    commandInfo.Result = results;
    property.SetValue(_module, commandInfo);
    DisposeContext();
    return _module;
}

As you can see from the highlighted code, we add the commands and the parameters to the shell using reflection from the metadata defined in the attributes to invoke the shell. The results are set back as property values to the ModuleObject and returned back to the test to assert the conditions.

A simple test code using the framework can be created like

var psHost = new PowerShellHost<XModule>();
var actual = psHost
    .Execute("Get-Greetings");

var result = actual.GetGreetings.Result.Select(psObject => psObject.BaseObject).OfType<string>().First();
Assert.AreEqual<string>(result, "Hello from VSTest");


Next in the series, we’ll see how to make use of our framework to stub methods/ cmdlets in the execution pipeline.

Saturday, January 17, 2015

Creating your own unit testing framework for PowerShell - Part 2

Before we dig into the testing process, one of the main activities to be done as part of the Arrange phase is to populate or ModuleObject properties with the CommandInfo object that is used at the Acting phase of our test framework. For iterating through all the properties and reading the attributes using reflection and setting the values of the ModuleObject implementation, we’ll make use of the Visitor pattern.
Our PsModuleVisitor implementation looks like

internal class PsModuleElement
{
    internal static void Accept(TPsModule module) where TPsModule : class, new()
    {
        var visitor = new PsModuleVisitor();
        visitor.Visit(module);
    }
}     

internal class PsModuleVisitor : IVisitor where TPsModule : class, new()
{
    public void Visit(TPsModule module)
    {
        PopulateModuleInfo(module);
    }

    private void PopulateModuleInfo(TPsModule module)
    {
        var methodProperties = typeof(TPsModule).GetProperties()
            .Where(prop => prop.IsDefined(typeof(PsModuleFunctionAttribute), false)).ToList();

        foreach (var methodProperty in methodProperties)
        {
            var modAttribute = methodProperty.GetCustomAttribute<PsModuleFunctionAttribute>();
            var name = modAttribute.Name;
            var paramAttributes = methodProperty.GetCustomAttributes<PsModuleParameterAttribute>().ToList();
            IDictionary parameters = null;
            if (paramAttributes.Any())
            {
                parameters = new Dictionary<string, string>();
                foreach (var paramAttribute in paramAttributes)
                {
                    parameters.Add(paramAttribute.Key, paramAttribute.Value);
                }
            }
            var commandInfo = new PsCommandInfo { Name = name, Parameters = parameters };
            methodProperty.SetValue(module, commandInfo);
        }
    }
}

internal interface IVisitor<in T> where T: class,new()
{
    void Visit(T module);
}


Next we’ll create our PowerShellHost test instance to invoke the methods from a visited ModuleObject 

Creating your own unit testing framework for PowerShell - Part 1

Recently I started working on a light weight unit testing framework for my PowerShell modules. There are a lot of testing frameworks for PowerShell that can be executed as script files from a PS host, but not many allows you to integrate with VSTests and write test methods and classes in C#. The following posts in this series is about how you can create a unit testing framework for Windows PowerShell and use it.

Being a big fan of the Page objects pattern and have seen the benefits of how easily you can model a page and reduce the amount of duplicate code when creating UI tests for websites, I wanted to do something similar modules for PowerShell also. So when I started writing the framework, one of the main considerations was to simplify my testing process by modelling a PowerShell module in code.

I also wanted to follow a more declarative approach on defining the metadata needed to provide inputs for my tests and model, so I started to think about attributes that I need to model a PowerShell module.

 To define a module name and the location of the module, I created the PsModuleAttribute with a Name and a Path property, so that I can use this attribute on my PSModule model for the ModuleObject pattern implementation.

[AttributeUsage(AttributeTargets.Class)]
public class PsModuleAttribute : Attribute
{
    public PsModuleAttribute(string name)
    {
        Name = name;
    }

    [Required(AllowEmptyStrings = false, ErrorMessage = "A PS module name should be provided to test a module")]  
    public string Name { get; set; }
    public string Path { get; set; }
}
Next I wanted to define the functions and the parameters for these functions in my model. The functions in the PowerShell module can be simulated as properties in the ModuleObject. Once you have these properties defined, you can use the same approach of using attributes to define name, parameters, return value etc. 

[AttributeUsage(AttributeTargets.Property)]
public class PsModuleFunctionAttribute : Attribute
{
    [Required(AllowEmptyStrings = false, ErrorMessage = "A module should have a name")]
    public string Name { get; set; }

    public PsModuleFunctionAttribute(string name)
    {
        Name = name;
    }
}            
[AttributeUsage(AttributeTargets.Property, AllowMultiple = true)]
public class PsModuleParameterAttribute : Attribute
{
    [Required(AllowEmptyStrings = false, ErrorMessage = "A parameter should have a name")]
    public string Key { get; set; }

    [Required(AllowEmptyStrings = false, ErrorMessage = "A parameter should have a value")] 
    public string Value { get; set; }

    public PsModuleParameterAttribute(string key, string value)
    {
        Key = key;
        Value = value;
    }
}

In the framework, I created the CommandInfo object to wrap these values in the properties.

public class PsCommandInfo
{
    public string Name { get; set; }
    public IDictionary Parameters { get; set; }
    public Collection<PSObject> Result { get; set; }
}

The final implementation of the ModuleObject should look like.

[PsModule("xModule", Path = @"E:\MyModules\xModule")]
public class XModule
{
    [PsModuleFunction("Get-HelloMessage")]
    [PsModuleParameter("context", "VSTest")]
    public PsCommandInfo GetGreetings { get; set; }
}

Next we’ll see how to extract this information in a unit test context to execute it.