Tuesday, April 12, 2011

Visual studio Lightswitch Step by Step – Part 5

Adding screen data
In this post, we’ll create screens to display/ add data to the entities created in the previous post.
  • To add a new screen for creating an order and specifying the details, right click Screens in solution explorer and then select Add Screen. Create a new Data Screen as select Orders as Screen data. Also add the details entity to the screen data for adding details to the order created.

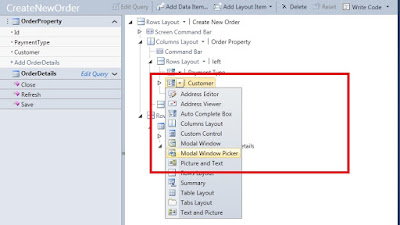
  • In the screen layout, change the customer control type to model window picker control. This will open a new popup search window to select a customer for the order.

  • Similarly change the Products control type to Model window picker control in the details grid.

  • Run the application to add a new order and mention the details.

  • To view the orders placed by a customer, add a new Customer details screen and specify to include the orders entity to the screen as given below.

  • Run the application to see the results.


Next we’ll see how to add calculated properties and custom validations to the application.

Monday, April 11, 2011

Visual studio Lightswitch Step by Step – Part 4

Adding choice data and Relationships

In this post, we’ll add new tables for creating orders and order details. We’ll also add relationships between the tables from different datasources (Products & Orders) and use in the application.

  • Right click the solution explorer right click Application data under data sources and select Add table. Name the table Order and add a new field for Payment Type as given below.

  • For the lookup options for Payment type, in the properties, click on the choice list link.

  • In the choice list add the following options and select OK.

  • Now we’ll add a relationship between customer and order. For this select Customer table and click on Relationships from the toolbox commands.
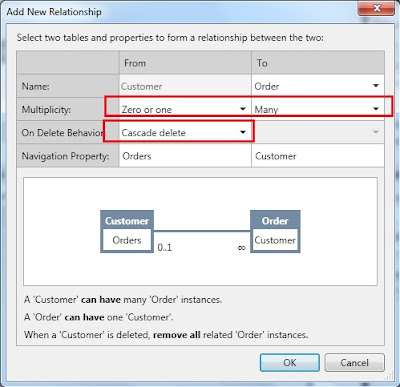
  • Add a One-to-many relationship between customers and orders. You can also specify the delete behavior on the relationship as given below.


  • Add another table OrderDetails for specifying the products purchased in the order and the quantity for each product. Add relationships for Order and Products for this table as given below.


  • The final output of the order details table looks like


Next we’ll see how to create an order and add products to the orders via lightswitch screens.

Saturday, April 9, 2011

Visual studio Lightswitch Step by Step – Part 3

Using Multiple Datasources
In this post, we’ll add another datasource to the project created and use the tables in the new datasource in our application.
  • In the solution explorer, right click datasources and select add data source

  • Select Database from the options and click next.

  • You can select the database in an existing DB and add the tables from that DB to the project. In this sample, I have added the Products table and data from a local database to the project.


  • Once you have added the table to the project, you can edit the properties to fit your application requirements. I have changed the datatype for the Price field to Money in the products table.

  • You can change the details of a field in the table by using the property pages as given below.

  • Let’s now create a detail screen to see the data from the data source we have added to the application. For that create a new List and details screen as given below.

  • Run the application and you can see the product details from the database in the application.

Visual studio Lightswitch Step by Step – (Part 2)

Creating a data entry and search screen

This post will demonstrate the creation of a lightswitch application
  • Open Microsoft Visual Studio 2010.
  • Select File > New Project and select LightSwitch Application (C#) template from the Installed Templates list.

  • Change the application’s Name to OnlineOrderApp and click OK
  • You'll be now presented with a screen to either Create a New Table (if the app is being created with an all new database) or Attach to External Database if you need to use LightSwitch as a front-end to an existing database.
  • Click on Create a New Table option from the list.
  • Add fields to the table (Customer) as given below and save the project

  • Next we’ll create a new data entry screen for the table we created.
  • In the Solution explorer, right click Screens and then select Add screen.

  • Select New Data Screen and name the screen CreateNewCustomer. Select Customer as the screen data. This will create a new screen with the controls and labels for the Customer entity.

  • You can change the default settings for the properties as given below.

  • Save the project and run the application to add the customer details.
  • You can use the Create new customer screen to add new customer details.

  • Similarly you can add more screens to the applications, like a search screen for customers as given below.

  • Run the application to verify the functionality.


Next we’ll see how to add multiple data sources to the application and extend the application and add more functionality.

Visual studio Lightswitch Step by Step – Introduction (Part 1)

Microsoft Visual Studio LightSwitch is a new flavor of Visual studio family that gives the users a simpler and faster way to create High-quality business applications for the desktop and the cloud. It is oriented to build forms over data business applications quickly and easily reducing the code base required to implement the CRUD. One of the main features is an intuitive designer that helps developers construct the applications using different data sources and designing screens in a much simpler and faster way.
Architecture
LightSwitch applications are built on classic three-tier architecture. Each tier runs independently of the others and performs a specific role in the application. The presentation tier is responsible for human interaction with the application. Its primary concern is data visualization and editing. The logic tier processes requests from a client to fetch data, update data, or to perform other operations. This tier’s primary role is to shield direct access to the data from unwanted or invalid reads and updates. This helps to ensure the long-term integrity and security of the data. The data storage tier is responsible for durable storage of the application data. 

Lightswitch team has a very good post series on the Anatomy of the Lightswitch application that gives more details on the architecture and the Presentation, Logic and Data storage tiers. Next we’ll create a sample lightswitch application and explore the features.