“Of all the Lean Startup techniques, Continuous Deployment is by far the most controversial. Continuous Deployment is a process by which software is released several times throughout the day – in minutes versus days, weeks, or months. Continuous Flow Manufacturing is a Lean technique that boosts productivity by rearranging manufacturing processes so products are built end-to-end, one at a time (using singe-piece flow), versus the more prevalent batch and queue approach.
Continuous Deployment is Continuous Flow applied to software. The goal of both is to eliminate waste. The biggest waste in manufacturing is created from having to transport products from one place to another. The biggest waste in software is created from waiting for software as it moves from one state to another: Waiting to code, waiting to test, waiting to deploy. Reducing or eliminating these waits leads to faster iterations which is the key to success.” – Eric Ries
Continuous deployment is one of the new trends in agile development that ensures release of software in a faster and reliable manner. It also helps the team to deliver value to customers early and often. In this post I’ll show how to setup a continuous integration environment using TeamCity and MSBuild scripts created by using a Web deployment project deploy your website every time a check in happens into the source safe.
TeamCity is a user-friendly continuous integration (CI) server from jet brains that is available as a free download from the vendor website. You can use go to the website http://www.jetbrains.com/teamcity/ to get your free copy. I have also used the Web deployment project from MS for MSBuild script generations in this sample.
For setting up the automated deployment on a website, you can follow the below given steps.
- Right click on the web application project for automated build and select Add Web Deployment Project

- On the ‘Add Web Deployment Project’ dialog give an appropriate name for the deployment project and press OK. This web deployment project created for the web application is the build scripts for MSBUILD.

- Next we can create the build configuration setup for the project. For this right click the solution and select Configuration manager.
- Unselect the build option for ‘Debug’ and ‘Release’ configurations for the Deployment project.

- On the Active solution configuration drop down select ‘New’

- On the ‘New Solution Configuration’ dialog, enter the name for the deployment configuration and press OK. Close the configuration manager window by selecting Close.

- Next we’ll create separate configuration options for staging environment. For e.g. the connection strings for the staging server will be different that the development environment. Right click the web application and add a new folder ‘Configuration’
- In the Configuration folder add a new configuration file ‘ConnectionStrings.Staging.Config’ and include the connection strings for the staging environment in this file. These settings will be replaced with the connection strings section in the web.config file when the deployment is started.

- We’ll now setup the deployment properties for the project. For that, right click the deployment project and select property pages.
- Change the output folder to the location where the build output will be deployed to.

- On the deployment section of the property pages, you can set transformations on the configuration options for the application. You can also mention the virtual directory options on this page. Save the settings by selecting OK.

- Next we have to configure the project on Team city. Login to team city as administrator and navigate to the Administration tab. On the administration page, select ‘Create Project’. Give an appropriate name for the project and select ‘Create’ option on the page.

- Next we have to configure the VSC settings used by TeamCity to obtain the source files for the build. For this select the VCS roots tab and click on ‘Create VCS roots’.
- Select the type of source control from the ‘Type of VCS’ dropdown to enter the source control specific configuration entries. Enter the URL, username, password and other details for the sub version and click on Create to update the configuration information.

- On the general tab, select ‘Create new build configuration’ to enter details for the build configuration. Enter a name for the build configuration and select VCS settings to continue.
- On the next page enter details for the checkout directory and Select ‘Add build Step’.
- Select MSBuild as the build runner and enter the name of solution as the Build file path option.

- On the build triggering, select ‘Add new trigger’. And select VCS trigger to trigger the build on every check in done to the source safe.
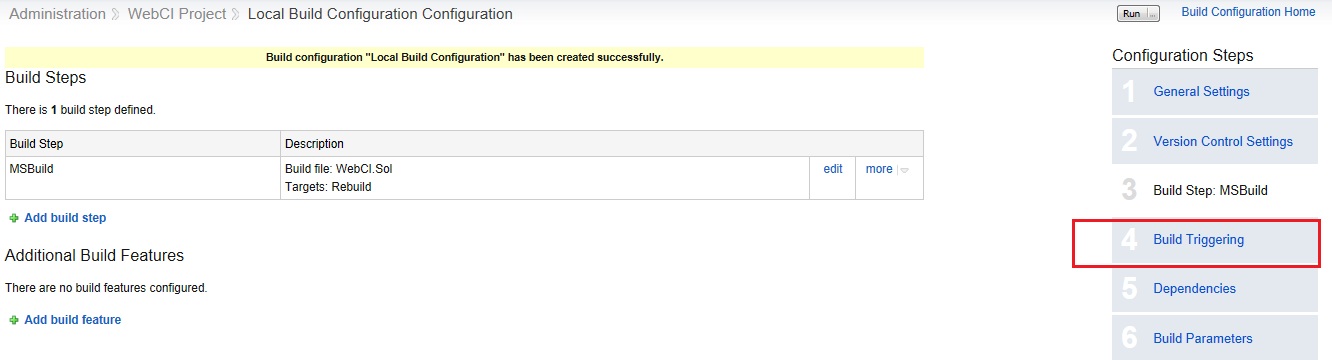

- Select Save and you have successfully created an automated build setup for your web application.