Wednesday, April 2, 2014

DevOps - Remote test execution

Developers can configure visual studio to run tests remotely and concurrently on a configured test controller and agent groups. The architecture should consist of developer machines with VS 2013, at least one test controller with test agents.

The test controller should be installed and configured with a test account that will be used to login to the controller service. The test controller manages a set of test agents to run tests. The test controller communicates with test agents to start, stop and collect test execution result.

Similarly the agents runs as a service that listens for requests from the test controller to start a new test. When a request is received, the test agent service starts a process on which to run the tests. Each test agent runs the same test. As part of agent configuration it is important to register it with a controller.

To setup remote execution of tests from Visual Studio, you need to add a new test settings file and set the test execution method to 'Remote execution'.


After setting the execution mode, now you can associate the tests with a controller by managing controller and agents from the settings window and start execution of the tests on the remote agent.

DevOps - Workbench deployment orchestration

DevOps Deployment Workbench offers customized XAML workflow templates that are designed to encapsulate many smaller individual deployment steps into a singular consistent workflow. Using the DevOps workbench you can create deployment Activities that offer many smaller coded XAML activities that perform distinct build or deployment tasks, such as updating of a value in an XML configuration document. All these activities can be later executed from the workbench UI to perform a deployment activity.
In this article we'll use the workbench UI to create a deployment orchestration and use this to perform a deployment activity.
  • From the DevOps workbench UI, create a new Deployment Orchestration as given below.

  • This creates a master deploy sequence which you can customize and extend by adding custom activities that describes your deployment process
  • From the properties box, change the master deploy sequence display name to your project deployment sequence name.

  • The deployment toolbox contains common deployment activities which you can use in your deployment sequence by dropping them to your activity
  • To start with the sample deployment scenario, we'll add a pre check for a valid operating system before copying the assemblies to the server.
  • From the toolbox, drag and drop the CheckOSName activity to the deployment sequence

  • From the toolbox drag and drop the .Net application deployment activity to the sequence and provide details for source and target as given below

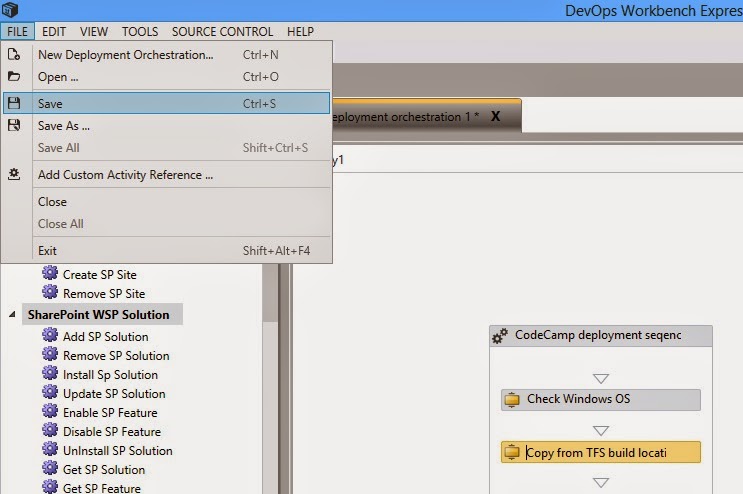
  • Save your orchestration to the disk

  • We'll now use this initial deployment sequence to deploy to a test server from the workbench UI.
  • For adding a new target server connection, choose Target Servers option from the menu

  • Click on Refresh to see the target servers for deployment

  • Once you have configured the target servers, you can deploy the application from the workbench UI by clicking on Deploy to servers from the menu
  • Choose your build, package name and target server details to deploy the application from the workbench

  • Click on start to start the deployment process


Tuesday, April 1, 2014

Setting up a local NuGet repository

Building and maintaining a local NuGet gallery helps you facilitate your development process with local packages which you do not want to publish to NuGet.org and make them free. It also helps you maintain and publish stable versions of your product that is accessible to all developers in your company or team. You can also integrate the package publishing from your TFS build to automatically publish stable versions of the package to your local NuGet.

In this post, we'll explore the steps necessary to create and consume your own NuGet gallery.
Prerequisites
Before you can get NuGet up and running you'll need some prerequisite software.
  • Visual Studio 2013
  • PowerShell 2.0
  • NuGet
  • Windows Azure SDK v2.2
  • xUnit for Visual Studio 2013

Setting up local NuGet gallery
Once you have ensured all the prerequisite software is installed. You need to clone the Nuget gallery repository from Git.

After successfully cloning the repository, open the command prompt and run the build command to build the project

The next step is to setup the website in IIS express.
  • Open the windows PowerShell console as Administrator and ensure that your have the execution policy set as UnRestricted.
  • In the PowerShell console, navigate to local NuGet gallery solution folder and run the Ensure-LocalTestMe.ps1 cmdlet from the tools folder

  • After setting up the IIS website, you need to create the database for the local NuGet gallery.
  • Open the Package Manager Console window from Visual Studio 2013
  • Ensure that the Default Project is set to NuGetGallery

  • Set the startup project of the solution to NugetGallery
  • Open the NuGetGallery.sln solution from the root of this repository.
  • Run the Update-Database command in the package manager console as given below.

  • Change the ConfirmEmailAddress settings value in the Web.Config file of the NugetGallery project to false, this disables confirmation of email address on uploading packages to the local gallery

  • Press Ctrl+f5 to run the website in IIS Express.


Configure Package manager settings in Visual Studio
After setting up your private repository, you need to configure Visual Studio to add your repository to the local package sources which works just like the public repository.
  • Open the Package Manager settings

  • Go to the Package Sources section.
  • Click the plus button to add a new source.

  • Specify a name and source of the new gallery

  • Click OK

Creating and uploading a NuGet package
  • To create a package, launch Package Explorer and select File > New menu option
  • Then select the Edit > Edit Package Metadata menu option to edit the package metadata.
  • The final step is to drag in the contents of your package into the Package contents pane. Package Explorer will attempt to infer where the content belongs and prompt you to place it in the correct directory within the package. For example, if you drag an assembly into the Package contents window, it will prompt you to place the assembly in the lib folder.

  • Save your package via the File > Save menu option.

  • After creating a package use the local NuGet gallery website to upload this package.

  • After uploading the package you can use the local gallery site to verify the uploaded package in the packages in the site.

  • Once the package is available in the local NuGet store, you can install this package from Visual Studio