Friday, March 28, 2008

Using LINQ for querying collections that implements IEnumerable

As a continuation to the article on managing collections I will try to focus on LINQ as part of querying the collections that implements the IEnumerable interface.
Using LINQ to query business objects in more easily than the methods I have mentioned in the previous blogs.
As an example I will use LINQ to query the employee names for all the employees whose salary is greater than 2000 as follows.

List<'Employee'> _employees = new List<'Employee'>{
new Employee(1){ EmployeeName = "Prajeesh Prathap", Salary = 1900},
new Employee(2){ EmployeeName = "Jacob Chacko", Salary = 4500},
new Employee(3){ EmployeeName = "Sreejith P.R", Salary = 2344},
new Employee(4){ EmployeeName = "Steve Micheal", Salary = 1099},
new Employee(5){ EmployeeName = "Mary John", Salary = 990},
new Employee(6){ EmployeeName = "Steve Hayden", Salary = 4500},
new Employee(7){ EmployeeName = "Samual Johnes", Salary = 3420},
new Employee(8){ EmployeeName = "Joseph Micheal", Salary = 900}
};

var names = _employees.Where(emp => emp.Salary > 2000)
.OrderBy(emp => emp.EmployeeName)
.Select(emp => emp.EmployeeName.ToUpper);

Or

var names = from name in _employees
where name.Salary > 2000
orderby name.EmployeeName
select name.EmployeeName.ToUpper;

where, select, orderby etc are queryoperators in LINQ defined in the System.Linq.Enumerable class.

LINQ can also be used to query a collection inside another collection based on certain filter criteria. Here’s another example for that.

public class Author
{
public String FirstName { get; set; }
public String LastName { get; set; }
public String Address { get; set; }
}

public class Book
{
public String Name { get; set; }
public List Authors { get; set; }
public String Technology { get; set; }
}

List<'Book'> _books = new List<'Book'>
{
new Book
{
Name = "CLR via C#",
Technology = ".Net",
Authors = new List
{
new Author{ FirstName = "Jeffrey", LastName = "Richter", Address = "" }
},
},
new Book{
Name = "Expert C# 2005 Business Objects",
Technology = ".Net, C#",
Authors = new List
{
new Author { FirstName = "Rockford", LastName = "Lhotka", Address = "" }
}
},
new Book{
Name = "Pro Service-Oriented Smart Clients with .NET 2.0",
Technology = ".NET 2.0",
Authors = new List
{
new Author { FirstName = "Sayed", LastName = "Hashimi", Address = "United States of America" },
new Author { FirstName = "Scott", LastName = "Steffan", Address = "" }
}
},
new Book{
Name = "Professional WinFX Beta",
Technology = "WPF, WCF, WF",
Authors = new List
{
new Author { FirstName = "Jean-Luc", LastName = "David", Address = "" },
new Author { FirstName = "Bill", LastName = "Ryan", Address = "Indianapolis," },
new Author { FirstName = "Ron", LastName = "DeSerranno", Address = "" },
new Author { FirstName = "Alexandra", LastName = "Young", Address = "Indianapolis," }
}
}
};


var authors = from book in _books
where book.Authors.Count > 1
from author in book.Authors
where author.Address != string.Empty
select author;

or


var authors = _books.Where(book => book.Authors.Count > 1)
.SelectMany(book => book.Authors)
.Where(author => author.Address != String.Empty);

Avoiding duplicate query results in LINQ

The Distinct operator is used for avoiding duplicate results in a LINQ to Object query, like many other query operators Distinct also does not have an equivalent keyword operator in C#. You have to use the methord call for including Distinct in your LINQ query.

Example:
var authors = _books.Where(book => book.Authors.Count > 1)
.SelectMany(book => book.Authors)
.Distinct()
.Where(author => author.Address != String.Empty);

We will see the application of other important query operators in LINQ in the next part of this series.

Wednesday, March 26, 2008

Using Lambda Expressions and Linq for manipulation of collections

In the previous article using anonymous method predicates to filter data in Generics, we saw how anonymous methods will ease the job of a developer instead of using delegates.
With the introduction of C# 3.0, we have much easier and better approaches for managing collections like LINQ and Lambda expressions. In this article I will try to use the new language features introduced in C# 3.0 to manage collections.
Lambda Expressions for method implementations provide a much easier and effective way for managing collections in .NET.
For example we can take the instance of sorting a Generic List of Customer objects.

public class Customer
{
public String FirstName { get; set; }
public String LastName { get; set; }
public Int32 CustomerID { get; private set; }

public Customer(Int32 id)
{
CustomerID = id;
}
public Customer(){ }

public override string ToString()
{

return FirstName + ", " + LastName + ", " + CustomerID.ToString();
}
}


For sorting this collection based on the FirstName using anonymous methods I use to code like

List _customers = new List
{
new Customer(1) { FirstName= "Prajeesh", LastName="Prathap" },
new Customer(2) { FirstName = "Sreejith", LastName="P.R" },
new Customer(3) { FirstName = "John", LastName = "Mitchel" },
};

_customers.Sort(delegate(Customer c, Customer c1)
{ return c.FirstName.CompareTo(c1.FirstName); });


By the introduction of Lambda expressions, I can change my code to use Lambda expressions instead of anonymous methods. When I use Lambda expressions the C# compiler will translate the code to an instance of a delegate as in the case of anonymous methods. The benefit of using Lambda expressions over anonymous methods is that anonymous methods require parameter type declarations to be explicitly stated, whereas Lambda expressions does not require parameter types and instead allow them to infer based on usage.

For example: consider the following code that uses Lambda expressions for sorting the _customers collection created above.

_customers.Sort((c, c1) => c.FirstName.CompareTo(c1.FirstName));


You can also explicitly declare Lambda parameters like

_customers.Sort((Customer c, Customer c1) => c.FirstName.CompareTo(c1.FirstName));

Using Enumerable class methods to manage collections

The Enumerable class provides a set of static methods for querying objects that implement IEnumerable.

We can use the Enumerable.OrderBy method for sorting a collection of objects as

private IEnumerable SortCustomers(List _customers)
{
return Enumerable.OrderBy(_customers, (cust) => cust.FirstName);
}

Or

private IEnumerable SortCustomers(List _customers)
{
return _customers.OrderBy((cust) => cust.FirstName);
}


Where OrderBy is an extension method declared in the Enumerable Class in System.Linq namespace.

Similarly for Filtering the Customer object based on FirstName we can use The Enumerable.Where method to obtain customers whose FirstName starts with “John”

IEnumerable _filteredCustomers =
Enumerable.Where(_customers, (cust) => cust.FirstName.StartsWith("John"));

Or

IEnumerable _filteredCustomers = _customers.Where((cust) => cust.FirstName.StartsWith("John"));

In the next series of this article we will see the usage of LINQ and how we can implement LINQ in our example to mange collections.

Thursday, March 20, 2008

Using Anonymous method Predicates to filter data in Generic List

Predicate is a delegate to a method that returns true if the object passed to it passes the condition defined in the delegate.

The List.FindAll() method finds all objects that match the supplied criteria specified in a predicate and returns a List. If no items are found, the resulting collection will be empty. The normal way of using predicates to filter a List collection uses a hard coded criterion for matching strings. The example illustrated in MSDN uses this approach. It uses a predicate which has a static method implementation with a hardcoded search string for matching the values. But in real world scenario we cannot use hardcoded strings for searching a List collection, instead we need a parameterized approach.

Using anonymous methods as an implementation of the System.Predicate can help me to achieve this without using a Static method as predicate for the List.FindAll() method. Using Anonymous methods it is possible to pass the complete method as parameter.
In the example given below I have followed this approach to search the occurrence of a string in a List collection.

List _users = new List();
_users.Add(new User("John Micheal", 23, "Bahamas"));
_users.Add(new User("Steve Hickman", 34, "Kensas"));
_users.Add(new User("Micheal Norman", 24, "New York"));
_users.Add(new User("John Ruf", 45, "New Jersey"));
_users.Add(new User("Alisha Menon", 34, "Bangalore"));
_users.Add(new User("John A", 56, "New York"));
_users.Add(new User("Amir Sinha", 34, "Bangalore"));

List _nameFilteredUsers = _users.FindAll(
delegate(User _user)
{
return _user.Name.Contains("John");
});

The _nameFilteredUsers returned the following List of users

John Micheal 23 Bahamas
John Ruf 45 New Jersey
John A 56 New York


Similarly we can use the same approach to filter users based on age as

List _ageFilteredUsers = _users.FindAll(
delegate(User _user)
{
return _user.Age > 30;
});


You can also create a method that filters the List of users and returns the filtered list based on the parameter passed.

private List FilterUserByName(List _users, String _searchString)
{
return _users.FindAll(delegate(User _user)
{
return _user.Name.Contains(_searchString);
});
}


And call the method like
List _filteredUsers = FilterUserByName(_users, "John");

Wednesday, March 19, 2008

Enterprise Library 3.1 – Exception Handling Application Block

Enterprise Library has introduced many new features into the world of exception management in the .NET environment. Enterprise Library's Exception Handling Application Block is a policy-driven system that lets an administrator determine how specific exceptions are handled in an application and allows a developer to concentrate on why and where exceptions should be handled.The Exception Handling Application Block is designed to support exception policies to be defined for an application so that many different types of exceptions can be handled by different kinds of exception handlers without the need to specify these relationships through code.It also provides extension points for creating new exception handlers and exception formatters that can be used by the Exception Handling Application Block.The exception handling block is designed to offer the best practices for handling exceptions in .NET applications.


Exception Policies
The policies define how certain exception types are handled by the Exception Handling Application Block. A particular policy can have multiple exception types associated with it. Each exception type within the policy can then have one or more exception handlers. The exception handlers supplied with Enterprise Library include those for logging, wrapping, and replacing exceptions.


The ExceptionPolicy class
The ExceptionPolicy class serves as a simple service interface for the Exception Handling Application Block. It contains only one static, public method: HandleException. The method is responsible for calling the GetExceptionPolicy method which uses a Factory pattern implementation to create an instance of the ExceptionPolicyImpl class for the named policy that was passed in from the HandleException method.


An exception policy must be configured with a PostHandlingAction for every type of exception that it has been configured to handle. The value for the PostHandlingAction determines what the return value for the HandleException method will be. The possible values for the PostHandlingAction property are NotifyRethrow, None, and ThrowNewException. The default is NotifyRethrow.


Exception Handlers
An exception handler performs an action based on the existence of a specific exception type. These are the components that actually handle the exception. Four exception handlers are provided with Enterprise Library:


  1. LoggingExceptionHandler: This exception handler formats exception information, such as the message and the stack trace. Then the logging handler gives this information to the Enterprise Library Logging Application Block so that it can be published.

  2. ReplaceHandler: This exception handler replaces one exception with another.

  3. WrapperHandler: This exception handler wraps one exception around another.

  4. FaultContractExceptionHandler: This exception handler is designed for use at Windows Communication Foundation (WCF) service boundaries, and generates a new Fault Contract from the exception.

You can create your custom Exception Handler by implementing the IExceptionHanlder Interface.

Exception Message Formatters
ExceptionFormatters provides a flexible way to configure and format exception messages. Two implementations of the ExceptionFormatter class come with Enterprise Library: TextExceptionFormatter and XmlExceptionFormatter. You can also design you own custom ExceptionFormatter simply by creating a subclass of ExceptionFormatter and provide your own formatting implementation. Both derive from the abstract ExceptionFormatter base class

When exceptions get handled in the Exception Handling Application Block, the ExceptionHandler calls an ExceptionFormatter's Format method to format the exception message.

TextExceptionFormatter Class
The TextExceptionFormatter class allows the exception and the details about the exception to be written out as plain text to an instance of a TextWriter class. This can be useful for writing to log files

XmlExceptionFormatter Class
This works exactly like the TextExceptionFormatter except that it uses an XmlTextWriter to format the message as XML instead of strings of indented text.

Configuring and Using the Exception Handling Application Block
For using Exception handling application block in you applications you need to add reference reference to these three assemblies at a minimum:

• Microsoft.Practices.EnterpriseLibrary.Common.dll:
• Microsoft.Practices.EnterpriseLibrary.ExceptionHandling.dll:
• Microsoft.Practices.ObjectBuilder.dll:


If you intend on using the Logging Application Block to log exceptions as they occur, you will also need to add the following two assemblies to your project’s references:

• Microsoft.Practices.EnterpriseLibrary.Logging.dll:
• Microsoft.Practices.EnterpriseLibrary.ExceptionHandling.Logging.dll:


  • Using the Enterprise library configuration console add a new Exception handling application block to the application.

  • Create an exception policy by right clicking the Exception Handling Application Block and select New --> Exception Policy

  • Create a new exception type for this exception policy to handle, Right-click the MyPolicy node and select New --> Exception Type. Change the name to MyApplication Policy
    Right Click the exception type and select New-->Exeption Type. Select Exception from the list.

  • To add the logging handler to the exception type, Right-click the Exception node and select New --> Logging Handler.

  • Click the Logging Hanlder under the Exception node and change the Category Source to General.
  • Select the formatter type by clicking the eclipse button on the Formatter Type property of the Logging handler and select TextExceptionFormatter.

  • Add the following code to throw an exception and handle that.
    private void ThrowExceptionAndHandle()
    {
    try
    {
    throw new ArgumentException("Testing the Enterprise Library Application Block");
    }
    catch (Exception ex)
    {
    ExceptionPolicy.HandleException(ex, "MyApplication Policy");
    }
    }

  • Open the Application Event Veiwer to see the exception details.

Friday, March 14, 2008

SQL Server 2005 management studio not getting installed in XP – Solution

I was setting up my system with Windows XP SP2, Visual Studio 2008 and SQL Server 2005 Developer version. After the installation of SQL Server I found that the management studio was missing from my startup menu options. I tried to reinstall the SQL Server but with no luck. I tried searching Google for a solution and found similar problems with lot of guys.

Thanks to the blog by Pete Orologas http://blogs.neudesic.com/blogs/pete_orologas/archive/2006/10/12/416.aspx on the same issue, I was able to find a work around for the issue. I tried to follow Pete’s method to get my management studio installed on my system by renaming my Tools folder and executing the SqlRun_Tools.msi file from the installation CD. But to add to my disappointment I got the warning from SQL Server setup “A component that you have specified in the ADD_LOCAL property is already installed. To upgrade the existing component, refer to the template.ini and set the UPGRADE property to the name of the component.” and the setup closed without completing the installation process.


Issue:


The visual studio installation comes with a SQL Server express edition along with it. During installation of Visual Studio it creates a folder in C:\Program Files\Microsoft SQL Server\90. During the installation of SQL Server 2005, it will look for the folder C:\Program Files\Microsoft SQL Server\90. If the folder exists the setup will skip the section for installing the tools.


Solution:

  • Rename the Tools folder in C:\Program Files\Microsoft SQL Server\90 folder and run the SqlRun_Tools.msi file from the Tools folder in the installation CD.
  • If the setup throws an error.
  • Open Add/Remove programs from control panel.
  • Select Microsoft SQL Server 2005. Click Change.
  • Check whether WorkStation Components are installed.
  • If yes, remove the workstation components by selecting the WorkStation Components and uninstalling that.
  • Rename the Tools folder in C:\Program Files\Microsoft SQL Server\90 folder and run the SqlRun_Tools.msi file from the Tools folder in the installation CD.
  • After installation you can find the Management Studio in your start menu under the Microsoft SQL Server folder.

Hope this may help someone while installing SQL Server.

Monday, March 10, 2008

Enterprise Library 3.1 - Caching Application Block (Part 2)

The previous article in this series explained about the features and architecture of the Caching application Block. In this series we will try to implement the Application Block.

Using the Caching Application Block

1. Add Enterprise Library 3.1 references to the project.
• Microsoft.Practices.EnterpriseLibrary.Caching.dll
• Microsoft.Practices.EnterpriseLibrary.Common.dll
• Microsoft.Practices.ObjectBuilder.dll
2. Right click the App.config file and select Edit Enterprise Library Configuration
3. Right click the Project in the Enterprise Library Configuration console and select New -->Caching Application Block


4. Create a backing store by right-clicking the Cache Manager node and select


New -->Isolated Storage.
5. Select the PartitionName property and name it MyCachePartition


6. Save and close the Configuration Console
7. Implement the ICacheItemRefreshAction


The ICacheItemRefreshAction interface refreshes the CacheManager instance when it is expired, preventing the occurrence of a Null Reference exception.


[Serializable]
public class CacheRefreshPolicy : ICacheItemRefreshAction
{
#region ICacheItemRefreshAction Members

public void Refresh(string removedKey, object expiredValue, CacheItemRemovedReason removalReason)
{
CacheManager _myCacheManager = CacheFactory.GetCacheManager();
_myCacheManager.Add(removedKey, "Item removed on " + DateTime.Today.ToLongDateString());
}

#endregion
}

8. Adding into the cache


CacheManager _myCacheManager = CacheFactory.GetCacheManager();

_myCacheManager.Add("MyCacheKey", CacheContentTextBox.Text,
CacheItemPriority.Normal, new CacheRefreshPolicy(),
new SlidingTime(TimeSpan.FromSeconds(60)));


9. Retrieving data from the cache


CacheManager _myCacheManager = CacheFactory.GetCacheManager();
if (_myCacheManager != null)
{
if (_myCacheManager.Contains("MyCacheKey"))
{
CacheContentLabel.Text = _myCacheManager.GetData("MyCacheKey") as String;
}
else
{
CacheContentLabel.Text = "Cache is missing!!!";
}
}
else
{
CacheContentLabel.Text = "Cache Manager is not present!!!";
}


10. Removing data from the cache


CacheManager _ myCacheManager = CacheFactory.GetCacheManager();
_ myCacheManager.Remove("MyCacheKey");

Tuesday, March 4, 2008

Enterprise Library 3.1 - Caching Application Block (Part 1)

In the previous article, I have explained how the Data Access Application Block can aid in accessing a back-end data store. It is always good to have data that will not disappear when a computer is shut off; the actual task of storing data can hinder performance. This is where the Enterprise Library Caching Application Block helps the developer. The caching block lets developers incorporate a local cache in their applications. It supports both an in-memory cache and, optionally, a backing store that can either be the database store or isolated storage. The application block can be used without modification; it provides all the needed functionality to retrieve, add, and remove cached data.


Caching can offer the following benefits:


Performance: When a local cache of relatively static data is available, an application no longer needs to deal with the overhead of making a call to a data store to retrieve the data.
Scalability: Storing information in a cache helps save resources and increases scalability as the demands on the application increase.
Offline availability: Caching can be very useful in offline smart client applications. The application may be able to survive system failures such as network latency, Web service problems, and hardware failures if the data is stored in the Cache.


Core Classes and Interfaces of the Caching Application Block


The Caching Application Block is composed of a series of core classes and interfaces that provide the caching functionality. The following are the core classes and interfaces of the Caching Application Block:
CacheManager class
CacheFactory class
BackgroundScheduler class
IBackingStore interface
ICacheItemExpiration interface
ICacheItemRefreshAction interface
IStorageEncryptionProvider interface


We will try to look into each of these classes and interfaces and understand what can be achieved by these classes.

The figure below shows the interrelationships between the key classes in the Caching Application Block.


Looking into the CacheManager and CacheFactory class


The CacheManger class is through which you interact with in your application. This singleton instance uses the CacheFactory class to create a single instance for each unique name as defined in the configuration file. Once the CacheManager instance has been created you can start creating and removing cached items from the instance. You can use the GetCacheManager method of the CacheFactory class to get the instance of the CacheManager object.


Adding items into the Cache.


Adding items into the cache is done by using the Add method of the CacheManager class. This is an overloaded method with two signatures.


public void Add(string key, object value, CacheItemPriority scavengingPriority, ICacheItemRefreshAction refreshAction, params ICacheItemExpiration[] expirations);

public void Add(string key, object value);

The Add method that only allows the key and value parameters to be specified will force the cached object to never expire and set the scavenging priority to normal. If you call the Add method with a key value that already exists within the named CacheManager instance, the CacheManager class will first remove the existing item, and then add the new one that was specified.


The scavengingPriority parameter determines how the scavenging background process will prioritize what items will be removed first during the scavenging process. The scavenging priorities are high, normal, low, and not removable. Cached objects with a low priority will be scavenged before cached objects with a normal or high priority. Normal priority cached objects are scavenged before high priority cached objects. Cached objects that have a scavenging priority of not removable will never be scavenged by the scavenging process.


The refreshAction parameter allows for passing in an object that will perform some action to update the cached object when it has expired. This can be very handy if an application is persisting the cached data to some backing store and is shut down for maintenance. When the application is brought back online, items will then be expired and allowed to be refreshed based on the implementation of the ICacheItemRefreshAction that was originally passed in.


The expiration policy parameters are rules that determine when a cached item should be expired from the cache. Since the params keyword is used, it is possible to specify more than one expiration policy per cached object.


Retrieving items from the Cache


You can use the GetData method or the indexer of the CacheManager class for retrieving Cached items.


Removing Cached Items


The Remove method allows you to remove a single cached object based on the key that is passed in. The Flush method will remove all cached objects from the CacheManager instance.


Looking into BackgroundScheduler class


The BackgroundScheduler class manages the life of cached objects in a background thread of the application domain. This includes expiring cached objects based on the expiration policies and scavenging stale cached objects that have not been accessed for an extended amount of time. The BackgroundScheduler object periodically monitors the lifetime of items in the cache. When an item expires, the BackgroundScheduler object first removes it and then, optionally, notifies the application that the item was removed. At this point, it is the responsibility of the application to refresh the cache.

The IBackingStore Interface


The IBackingStore interface provides the interface that the Cache object will use to store the cached objects in a persisted location.


The IStorageEncryptionProvider Interface


This interface provides the interface to protect the Cache data when it is stored to persistence storage. This interface exposes the Encrypt and Decrypt methods for achieving the functionality. The Caching application Block provides a symmetric cryptography provider that allows the use of the Cryptography Application Block to determine how to encrypt and decrypt data. It is possible to provide your own encryption solution by implementing the IStorageEncryptionProvider interface and supplying the necessary configuration support.


In the Next series of this article, I will explain how to use the Caching Application Block in your applications.

Monday, March 3, 2008

Enterprise Library 3.0 - Using the Data Access Application Block

The Enterprise Library 3.0 Data Access Application Block is meant to handle a majority of your data access needs.

Compared to the previous versions of Data Access Application block a few important changes are made in Enterprise Library 3.0. I have listed the important changes below

• You can utilize your application configuration file to store connection strings, or you can specify connection strings in your code.
• The API has been simplified to utilize the ADO.NET’s DbCommand class, as opposed to the DbCommandWrapper class of prior versions.
• You can use the Data Access Application Block with any ADO .NET 2.0 data provider via the GenericDatabase class.

This article will focus on how to create a generic data access layer using the Enterprise Library 3.0 Data Access Application Block.

ADO.Net 2.0 Database Provider Base Classes
The new base classes found in the System.Data.Common namespace in ADO.NET 2.0 gives the developer the ability to create data access layers that can perform most of the necessary functions of manipulating or selecting data from any database, without needing to change the SQL command statements, for the most part.
The DbProviderFactory factory class helps us to achieve this functionality.

Using the DbProviderFactory class to create an instance of the Database
In order for the DbProviderFactories class to function properly, it is necessary for the proper configuration data to be inserted into the machine.config or application configuration file (web.config/ app.config). Below are the entries in a sample configuration file.


The above configuration details contain three critical attributes that define the factory specifics:

• The invariant attribute, which can be used by the GetFactory(string) method to return the specific DbProviderFactory concrete implementation. For example: calling the GetFactory method using System.Data.SqlClient would return the instance of SqlClientFactory.
• The support attribute, which is responsible for determining the types that the DbProviderFactory’s Create methods can create.
• The type attribute, which defines the actual DbProviderFactory concrete implementation that should be instantiated.

Now with the use of the connection string settings, database provider base classes, and provider factory classes, it is possible to create a connection object without specifying its type within the code of an application. The following application code can be to create the connection object and the use of the providerName attribute to define the correct factory provider class to instantiate.

Sample Application Configuration file entry


Sample Provider Factory code
public DbConnection GetConnection ()
{
ConnectionStringSettings _settings = ConfigurationManager.ConnectionStrings["AdventureWorks"];
DbProviderFactory factory =
DbProviderFactories.GetFactory(_settings.ProviderName);
DbConnection connection = null;
connection = factory.CreateConnection();
connection.ConnectionString = connSetting.ConnectionString;
return connection;
}

Now it is possible to write code that is generic and be able to use any provider that implements
the database provider base classes. Similarly you can use the DbProviderFactory class to create the necessary DbCommand objects, DbDataAdapter objects, DbDataReader objects, and so on to complete their data access layer implementation.

Executing Commands against the Database

The Database class contains the methods necessary for executing commands against a database.
Like the DbCommand class, Database has ExecuteScalar, ExecuteNonQuery, and ExecuteReader methods. The Database class also adds three more methods—ExecuteDataSet, LoadDataSet, and UpdateDataSet—which are used for retrieving untyped and typed DataSets, as well as updating data from a DataSet to a database.

Specifying Parameters for a Database Command Object

Parameters can be added to the DbCommand object directly via the DbCommand.Parameter.Add method. However, while this may seem like the easiest approach, it actually may not be the best practice. Each database provider has its own way of marking up a parameter name. For instance, preceding each parameter name, SQL Server adds an at sign (@), Oracle adds a colon (:), and OLEDB and ODBC add a question mark (?). The Data Access Application Block Database class handles each prefix for you. This way, it is easier to switch from one database provider to another with very little, if any, code changes.

You can add parameters to the DbCommand object through the AddParameter method, the AddInParameter method, or the AddOutParameter method. Typically, it is easier to use the AddInParameter or AddOutParameter methodthe following code demonstrates adding parameters using the Database class.

Adding database command parameters via Database class.
public void SaveUser(User _user)
{
Database _userDB = DatabaseFactory.CreateDatabase();
DbCommand _command = _userDB.GetStoredProcCommand("SaveUser");
_userDB.AddInParameter(_command, "FirstName", DbType.String);
_userDB.AddInParameter(_command, "LastName", DbType.String);
_userDB.AddInParameter(_command, "Salary", DbType.Decimal);
_userDB.AddInParameter(_command, "dob", DbType.DateTime);

_userDB.SetParameterValue(_command, "FirstName", _user.Firstname);
_userDB.SetParameterValue(_command, "LastName", _user.Lastname);
_userDB.SetParameterValue(_command, "Salary", _user.Salary);
_userDB.SetParameterValue(_command, "dob", _user.Dob);

_userDB.ExecuteNonQuery(_command);
}


Understanding the Database Factory Class

A Database object can be created by using a factory via the DatabaseFactory class or by directly constructing one. The DatabaseFactory class uses configuration information to determine the connection string, ADO.NET data provider, and appropriate Data Access Application Block Database class implementation to instantiate. The DatabaseFactory class uses the static method CreateDatabase to create the specific Database subtype. The CreateDatabase method has two signatures

· CreateDatabase() : Database - Does not take any parameters and creates the default database instance defined in the application’s configuration file
· CreateDatabase(stringname) : Database - Takes a string parameter that allows the developer to determine by name which instance should be returned

The DatabaseFactory class uses the connections defined in the connectionStrings node of the application configuration file. If no provider is specified in the specific named instance of a connection string, a SqlDatabase instance is presumed. By default, the DatabaseFactory class creates Database objects of the following types:

SqlDatabase for data providers specified as System.Data.SqlClient
SqlCeDatabase for data providers specified as System.Data.SqlServerCe
OracleDatabase for data providers specified as System.Data.OracleClient
GenericDatabase for all other data provider types

An instance of the GenericDatabase class can be used with any .NET managed provider, including the ODBC and OLEDB providers that are included in .NET Framework 2.0 and 3.0.

Configuring the Data Access Application Block.

Configuring the Data Access Application Block can be done either manually through a text editor or via the Configuration Console. The benefit of using the Configuration Console is that it will validate the configuration data entered, thus ensuring that that data is set up properly. Therefore, although it is possible to modify the configuration data manually, it is generally suggested that the Configuration Console be used whenever possible.

In this exercise we will be using the Enterprise Library configuration console for configuring the Data Access Application Block.


1. Creating the Database

/****** Object: Table [dbo].[Users] Script Date: 03/03/2008 16:36:59 ******/
IF EXISTS (SELECT * FROM sys.objects WHERE object_id = OBJECT_ID(N'[dbo].[Users]') AND type in (N'U'))
DROP TABLE [dbo].[Users]
GO
/****** Object: Table [dbo].[Users] Script Date: 03/03/2008 16:36:59 ******/
SET ANSI_NULLS ON
GO
SET QUOTED_IDENTIFIER ON
GO
IF NOT EXISTS (SELECT * FROM sys.objects WHERE object_id = OBJECT_ID(N'[dbo].[Users]') AND type in (N'U'))
BEGIN
CREATE TABLE [dbo].[Users](
[UserID] [int] NOT NULL,
[FirstName] [nvarchar](250) COLLATE SQL_Latin1_General_CP1_CI_AS NOT NULL,
[LastName] [nvarchar](250) COLLATE SQL_Latin1_General_CP1_CI_AS NULL,
[Salary] [money] NULL,
[DOB] [datetime] NULL,
CONSTRAINT [PK_Users] PRIMARY KEY CLUSTERED
(
[UserID] ASC
)WITH (PAD_INDEX = OFF, STATISTICS_NORECOMPUTE = OFF, IGNORE_DUP_KEY = OFF, ALLOW_ROW_LOCKS = ON, ALLOW_PAGE_LOCKS = ON, FILLFACTOR = 80)
)
END

-- =============================================
-- Author: Prajeesh Prathap
-- =============================================
CREATE PROCEDURE [dbo].[GetAllUsers]
-- Add the parameters for the stored procedure here
AS
BEGIN

SET NOCOUNT ON;
SELECT * from [Users]
END


-- =============================================
-- Author: Prajeesh Prathap
-- =============================================
CREATE PROCEDURE SaveUser
@FirstName varchar(250),
@LastName varchar(250),
@Salary money,
@dob datetime
AS
BEGIN
SET NOCOUNT ON;
DECLARE @UserID int
SELECT @UserID = MAX(UserID) from Users

IF (@UserID is not NULL)
SET @UserID = @UserID + 1
else
SET @UserID = 1
insert into users(userid, firstname, lastname, salary, dob)
values
(@UserID,
@FirstName, @LastName, @Salary, @dob)
END
GO

(I have created a table Users and two Stored Procedures for pulling data and inserting data into the above table)

2. Add references to the following enterprise library assemblies into the data access layer project.

Microsoft.Practices.EnterpriseLibrary.Common;
Microsoft.Practices.EnterpriseLibrary.Data;
Microsoft.Practices.EnterpriseLibrary.ObjectBuilder;

3. Add a new application configuration file to the project (App.Config)

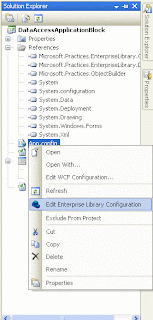
4. Right click the App.config file and select Edit Enterprise Library Configuration


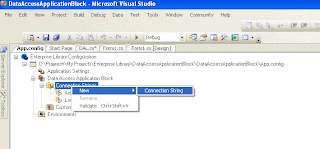
5. In the configuration console Right Click the Connection Strings node under Data Access Application Block and select New--> Connection String


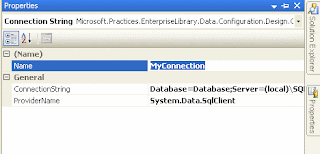
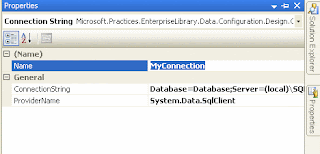
6. In the Properties change the name of the newly added connection string to MyConnection


7. Build the connection string by selecting the eclipse on the ConnectionString property in the properties box.


8. Select the Data Access Application Block and press F4 to display the Data Access Application Block properties.

9. Change the Default Database to MyConnection


10. Save and Close the configuration console.

11. Create the User Business Entity as follows

public class User
{
private int userid;

public int Userid
{
get { return userid; }
set { userid = value; }
}
private string firstname;

public string Firstname
{
get { return firstname; }
set { firstname = value; }
}
private string lastname;

public string Lastname
{
get { return lastname; }
set { lastname = value; }
}
private decimal salary;

public decimal Salary
{
get { return salary; }
set { salary = value; }
}
private DateTime dob;

public DateTime Dob
{
get { return dob; }
set { dob = value; }
}
}

12. Creating the User Data Access Layer

using System;
using System.Collections.Generic;
using System.Text;
using Microsoft.Practices.EnterpriseLibrary.Common;
using Microsoft.Practices.EnterpriseLibrary.Data;
using System.Data.Common;
using System.Data;

public class UserDAL
{
Database _userDB;
public UserDAL()
{
_userDB = DatabaseFactory.CreateDatabase();
}

public List GetAllUsers()
{
List userList = new List();
DbCommand _command = _userDB.GetStoredProcCommand("GetAllUsers");
using (IDataReader _reader = _userDB.ExecuteReader(_command))
{
User user;
while (_reader.Read())
{
user = new User();
user.Userid = (int)_reader["UserID"];
user.Firstname = _reader["FirstName"].ToString();
user.Lastname = _reader["LastName"].ToString();
user.Salary = (decimal)_reader["Salary"];
user.Dob = (DateTime)_reader["DOB"];
userList.Add(user);
}
}
return userList;
}

public void SaveUser(User _user)
{
DbCommand _command = _userDB.GetStoredProcCommand("SaveUser");
_userDB.AddInParameter(_command, "FirstName", DbType.String);
_userDB.AddInParameter(_command, "LastName", DbType.String);
_userDB.AddInParameter(_command, "Salary", DbType.Decimal);
_userDB.AddInParameter(_command, "dob", DbType.DateTime);


_userDB.SetParameterValue(_command, "FirstName", _user.Firstname);
_userDB.SetParameterValue(_command, "LastName", _user.Lastname);
_userDB.SetParameterValue(_command, "Salary", _user.Salary);
_userDB.SetParameterValue(_command, "dob", _user.Dob);

_userDB.ExecuteNonQuery(_command);


}
}

Summary
The Data Access Application Block provides a lot of functionality for making database calls from a data access component. It can save coding time, reduce code, and support database provider independence. It is important to note that while a lot of features are provided in the Data Access Application Block, there may be times when it’s necessary to use only certain features, or possibly none at all. However, for the most part, it should meet most, if not all, of your data access needs.

The next article of this series will focus on the Caching Application Block.