Showing posts with label Unity Application Block. Show all posts

Saturday, March 17, 2012

Dependency injection – Auto registration in Unity


Unity Auto Registration extends Unity IoC container and provides fluent syntax to configure rules for automatic type registration. You can add Unity Auto Registration package using NuGet package manager.


Using few code lines you can scan specified assemblies and register all types that satisfy the rules. Rules for determining whether to include/exclude type/assembly are predicates so you can use lambda syntax to specify them or direct method name. For e.g. you can register interfaces, using AsFirstInterfaceOfType() which will throw an exception if more than one interface is found on a type.  You can also use decorated attributes type to register types to the container.
For e.g. All my repositories that implement the type
public interface IRepository
{
    IEnumerable All();
    T One(Funcbool> condition);
    IEnumerable All(Funcbool> condition);
    void Add(T entity);
    void Save(T entity);
    void Remove(T entity);

    HashSet Context { get; }
}
public class CustomerRepository : BaseRepository<Customer>
{
    //Implementation methods
}
Can be registered as
_container = new UnityContainer();
_container.ConfigureAutoRegistration()
    .LoadAssembliesFrom(RegistrationAssemblies.AssemblyNames)
    .Include(r => r.ImplementsOpenGeneric(typeof(IRepository<>)), Then.Register().AsFirstInterfaceOfType())
    .ApplyAutoRegistration();
Where RegistrationAssemblies.AssemblyNames is a string array of the assemblies to look for types to register.
You can also decorate the types with a common attribute to register types. For e.g. the business logic components in this sample is decorated with the attribute [Logic] as given below

[Logic]
public class CustomerLogic : ICustomerLogic
{
    public IEnumerable<Customer> GetAllByName(string name)
    {
        var repository = IoC.Container.Resolve<IRepository<Customer>>();
        return repository.All(c => c.Name.StartsWith(name));
    }
}
These types can be registered using the DecoratedWith method as given below.
_container = new UnityContainer();
_container.ConfigureAutoRegistration()
    .LoadAssembliesFrom(RegistrationAssemblies.AssemblyNames)
    .Include(r => r.ImplementsOpenGeneric(typeof(IRepository<>)), Then.Register().AsFirstInterfaceOfType())
    .Include(If.DecoratedWith<Logic>, Then.Register().AsFirstInterfaceOfType())
    .ApplyAutoRegistration();

Friday, December 9, 2011

Aspect Oriented Programming and Interceptor pattern - Creating a Session handler for ASP.NET


Interceptor pattern can be used for addressing cross cutting concerns in the application that happens at either the beginning or end of a method. For e.g. checking the validity of the input parameters before executing the method and throwing exceptions, catching and logging exceptions etc. These situations can be encapsulated in a reusable component that can be processed by the compiler and produce executable code (AOP).
Unity allows developers to implement the idea of interception by allowing creation of objects that can add some extra code on the target method before or after the regular execution of these target methods. In this post, I'll show how to create a Session handler for ASP.Net using the interface interception mechanism provided by unity application block, that will allow you to address encapsulate the logic for checking session for a value before execution of the method and returning back the value from session if available. The same handler can be used to also add the return value to the session if not available so that this value can be retrieved next time.
Creating the session handler
public class SessionHandler : ICallHandler
{
    private readonly string _sessionKey;

    public SessionHandler(string sessionKey)
    {
        _sessionKey = sessionKey;
    }

    public ISessionService SessionService
    {
        get { return Container.Instance.Resolve<ISessionService>(); }
    }

    public IMethodReturn Invoke(IMethodInvocation input, GetNextHandlerDelegate getNext)
    {
        if (SessionService.Contains(_sessionKey))
        {
            input.CreateMethodReturn(SessionService.Get(_sessionKey));
            return getNext()(input, getNext);
        }

        var returnValue = getNext()(input, getNext);
        SessionService.Add(_sessionKey, returnValue.ReturnValue);
        return returnValue;
    }

    public int Order { get; set; }
}

The session handler uses the session service which encapsulates the actual Session object to add/ remove values from the session.  You can also use the HttpContext.Current.Session object here.
Creating the Attribute for the handler
public class SessionDependencyAttribute : HandlerAttribute
{
    private readonly string _sessionKey;
       
    public SessionDependencyAttribute(string sessionKey)
    {
        _sessionKey = sessionKey;
    }

    public override ICallHandler CreateHandler(IUnityContainer container)
    {
        return new SessionHandler(_sessionKey);
    }
}

Creating a service and using the SessionHandler we created.
public interface IMockService
{
    [SessionDependency("TestKey")]
    string GetValue(bool flag);
}

public class MockService : IMockService
{
    public string GetValue(bool flag)
    {
        return flag ? "True" : "False";
    }
}

Configuring the Unity container
_container = new UnityContainer();
_container.AddNewExtension<Interception>();


_container
    .RegisterType<ISessionService, SessionService>()
    .RegisterType<IMockService, MockService>()
    .RegisterType<MockPresenter>()
    .Configure<Interception>().SetDefaultInterceptorFor<IMockService>(new InterfaceInterceptor());

Test cases
[TestMethod]
public void MethodShouldReturnValueFromSessionIfValueDoesNotExistsAndAddToSession()
{
    var service = Container.Instance.Resolve<IMockService>();
    var actual = service.GetValue(true);

    Assert.IsTrue(SessionService.Contains("TestKey"));
}

Monday, November 28, 2011

Using Unity to Resolve Instances based on condition


Unity is a lightweight, extensible dependency injection container with support for nested containers that stores registrations and mappings between types and can instantiate the appropriate concrete types on demand. Identification of the registrations in unity can be done using a type and a name (optional).
You can use unity to register multiple implementations of the same type and later resolve the actual instance by passing the name for identifying the actual implementation. In this post we'll see how to resolve the instances registered in unity application block conditionally.
For e.g. I have created a sample interface and implementations as given below
public interface IMyObject
{
    string DoSomething();
}

public class MyObjectFirstImplementation : IMyObject
{
    public string DoSomething()
    {
        return "First";
    }
}

public class MyObjectSecondImplementation : IMyObject
{
    public string DoSomething()
    {
        return "Second";
    }
}

The registration of these components are done like
container
    .RegisterType<IMyObject, MyObjectFirstImplementation>(DependencyRegistrationKeys.FirstImplementation)
    .RegisterType<IMyObject, MyObjectSecondImplementation>(DependencyRegistrationKeys.SecondImplementation);

public static class DependencyRegistrationKeys
{
    public const string FirstImplementation = "FIRST_IMPLEMENTATION";
    public const string SecondImplementation = "SECOND_IMPLEMENTATION";
}

The factory class has a create method that accepts and object key to resolve the actual instances
public class MyObjectFactory
{
    public IMyObject Create(string objectKey)
    {
        return Container.Instance.Resolve<IMyObject>(objectKey);
    }
}

Tests
[TestMethod]
public void CreateMethodShouldReturnTheObjectImplementationBasedOnConditionPassed()
{
    var factory = new MyObjectFactory();
    var myObject = factory.Create(DependencyRegistrationKeys.FirstImplementation);

    Assert.IsInstanceOfType(myObject, typeof(MyObjectFirstImplementation));
}

Thursday, August 11, 2011

ASP.NET dependency injection using Unity Application Block


ASP.NET was not designed with the concepts of DI and IoC in mind. That makes it very difficult to actually configure a website/ application using ASP.NET to use the concepts of IoC and resolve the dependencies when the pages are requested. An easier way to resolve the dependencies on the page will be using the container and requesting for the resolved types for dependencies. A much better approach is to interpret the page creation implementation code in ASP.NET and resolve the dependencies on the Page from there. In this post I'll show a sample scenario where we'll intercept the page creation logic and resolve the dependencies on the page using Unity container.
The sample used in this article has views that have dependencies on the respective presenters. The presenters will depend on the service abstractions to do their work.
I have the base presenter and view interface declarations as
public abstract  class AppPresenter where T : IAppView
{
    public T View
    {
        get
        {
            if (HttpContext.Current == null) return DependencyInjection.Container.Resolve();
            return (T)HttpContext.Current.Handler;
        }
    }

    public abstract void InitializeViewEvents();
}

public interface IAppView
{
}

For resolving the dependencies on my views, I have created a custom PageHandler implementation which looks like.
public class UnityPageHandlerFactory : PageHandlerFactory
{
    public override IHttpHandler GetHandler(HttpContext context, string requestType, string virtualPath, string path)
    {
        var view = base.GetHandler(context, requestType, virtualPath, path) as Page;
        if (view == null) return view;

        DependencyInjection.Container.BuildUp(view.GetType(), view);
        return view;
    }
}

<httpHandlers>
  <add path="*.aspx" verb="*" type="BlogsPrajeesh.WebForms.DI.UnityPageHandlerFactory" />
httpHandlers>
I have created an extension method on the container to register the dependencies while initializing the container
public static class DependencyRegistrations
{
    public static void SetupRegistrations(this UnityContainer container)
    {
        container
            .RegisterType<IHomeView, HomeViewNullObject>()
            .RegisterType<IHomeService, HomeService>()
            .RegisterType<HomePresenter>();
    }
}

Later when the container is initialized you can call the SetupRegistrations methods on the container. container.SetupRegistrations();

A sample view – Presenter implementation can be done like.
public partial class Home : Page, IHomeView
{
    private HomePresenter _presenter;
    public new event EventHandler OnLoad;

    [Dependency]
    public HomePresenter Presenter
    {
        set { _presenter = value; }
    }

    protected void Page_Load(object sender, EventArgs e)
    {
        _presenter.InitializeViewEvents();
        if (OnLoad != null) OnLoad(this, EventArgs.Empty);
        lblHello.Text = _presenter.GetMessage();
    }
}

public class HomePresenter : AppPresenter<IHomeView>
{
    private readonly IHomeService _homeService;

    public HomePresenter([Dependency] IHomeService homeService)
    {
        _homeService = homeService;
    }

    public string GetMessage()
    {
        return _homeService.GetMessage();
    }

    public override void InitializeViewEvents()
    {
        View.OnLoad += new EventHandler(View_OnLoad);
    }
}

Using this kind of an implementation allows you to completely unit test your ASP.NET web application.
[TestMethod]
public void GetMessageShouldRetrieveTheMessageFromTheRegisteredService()
{
    var presenter = DependencyInjection.Container.Resolve<HomePresenter>();
    Assert.IsFalse(string.IsNullOrEmpty(presenter.GetMessage()));
}

Friday, May 6, 2011

IoC - Unity as a DI and Service Locator container

Inversion of control (IoC) is an abstract principle describing an aspect of some software architecture designs in which the flow of control of a system is inverted in comparison to procedural programming. Rather than a caller deciding how to use an object, in this technique the object called decides when and how to answer the caller, so the caller is not in charge of controlling the main flow of the application. This approach makes your code flexible enough to be decoupled.

Some of the main advantages of using IoC in your code are
  • Your code gets decoupled so you can easily exchange implementations of an interface with alternative implementations
  • It is a strong motivator for coding against interfaces instead of implementations
  • It's very easy to write unit tests for your code because it depends on nothing else than the objects it accepts in its constructor/setters and you can easily initialize them with the right objects in isolation.

The pattern is implemented through injecting dependencies into a component when it is constructed. These dependences are usually provided as interfaces for further decoupling and to support testability.

IoC can be implemented using many techniques as given below
  • Setter Injection
  • Constructor Injection
  • Interface Injection
  • Factory Pattern
  • Service Locator Pattern etc.

This post we'll see how to use the Unity Application block as a DI container and Service Locator implementation for implementation of the IoC pattern.

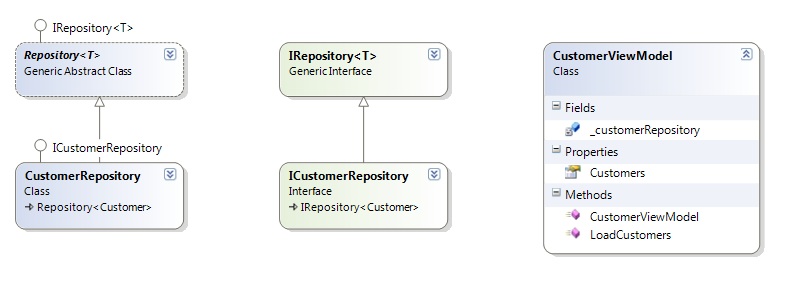
Sample object model used in the example.


Unit as a DI container
The example code we use has ViewModel which has a dependency on a CustomerRepository. The CustomerRepository is declared in the container and it is responsible to create and instance and resolve the dependency when the ViewModel is created. To specify the dependency we have decorated the constructor of the ViewModel with an [InjectionConstructor] attribute to specify that Unity will be in charge of creating this object at runtime.
public class CustomerViewModel
{
    [InjectionConstructor]
    public CustomerViewModel(ICustomerRepository customerRepository)
    {
        _customerRepository = customerRepository;
    }

    public void LoadCustomers()
    {
        Customers = new ObservableCollection<Customer>(_customerRepository.GetAll());
    }

    public ObservableCollection<Customer> Customers { get; set; }
    private readonly ICustomerRepository _customerRepository;
}

[TestClass]
public class CustomerViewModelFixture
{
    [TestInitialize]
    public void Initialize()
    {
        _container = new UnityContainer()
            .RegisterType<ICustomerRepository, CustomerRepository>()
            .RegisterType<CustomerViewModel>();
    }


    [TestMethod]
    public void LoadDataShouldLoadTheCustomersFromContextUsingDiTest()
    {
        var viewModel = _container.Resolve<CustomerViewModel>();
        viewModel.LoadCustomers();
        Assert.IsTrue(viewModel.Customers.Count > 0);
    }

    private IUnityContainer _container;
}

Unity as Service Locator
To use the Service Locator with Unity you need an adapter, which you can find on the CodePlex website at http://commonservicelocator.codeplex.com . You can create an adapter as given below.
_container = new UnityContainer()
    .RegisterType<ICustomerRepository, CustomerRepository>()
    .RegisterType<CustomerViewModel>();

var provider = new UnityServiceLocator(_container);
ServiceLocator.SetLocatorProvider(() => provider);

_serviceLocatorProvider = ServiceLocator.Current;

And then use this Service locator to resolve the dependencies in your code like.
var customerRepository = _serviceLocatorProvider.GetInstance<ICustomerRepository>();
var viewModel = new CustomerViewModel(customerRepository);
viewModel.LoadCustomers();
Assert.IsTrue(viewModel.Customers.Count > 0);