Showing posts with label Architecture. Show all posts

Sunday, March 6, 2016

Microservices – Why does it matter for continuous delivery


Software delivery organizations across the globe has adopted continuous delivery as a central practice to build high quality software faster, with less stress and effort. One of the goals of continuous delivery is to make deployments as boring as possible. To assure that we need to deploy often and find errors as soon as possible before delivering the software to end user, continuous delivery promotes certain architectural approaches of a platform. Releasing often, with small changes, is extremely difficult task to perform for a complex application with a huge monolithic architecture. The idea of rearranging the software architecture into smaller, focused, domain-specific applications composed of microservices has gained a lot of popularity in the last 2-3 years.
Microservices are a new software development pattern emerging from recent trends in technology and practice. A microservice is an independent, self-contained process that provides a single business capability. Different Microservices act in concert as one larger system by communicating to each other using a language agnostic API. In microservice architecture each service is highly decoupled from each other and are created in mind to focus on one problem domain.


Monolithic and the problem for continuous delivery

Traditional monolithic applications are built as a single unit, where all the functionality is pulled into a single process and is replicated across multiple servers. The single application is responsible for all functionality including handling requests, authentication, executing business/ domain logic, persistence, logging, exception handling etc. Due to this behavior its makes it hard to add a small change in the system that involves building, testing and deploying the entire application. Scalability and availability involves running multiple instances of this application behind a load balancer on multiple servers even though the bottleneck lays in a single component in the application. As a result, updating monolithic applications become time-consuming activity that needs to have a lot of coordination between people involved in multiple functions and departments.
Apart from the issues related to deployment and scalability, there are some other challenges that this kind of architecture brings when the application grows in size.
A large code base makes it hard for all the developers to understand and modify the application. This makes the code base harder to manage and difficult to add new features which also results in bad quality creeping in as time progress. The team is forced to stick on the technology stack which was chosen at the time of starting the development and commit to the stack for a long-term. This also introduces dividing engineering teams at an organization level to focus on specific functional areas, like UI team , database teams etc. The coordination, development and deployment processes becomes harder with this structure which takes the teams a step backward in their journey towards practices like DevOps, continuous delivery etc.

How microservices helps?

In contrast to Monolithic applications, microservices makes independent management of business functionality by separating the functionality into smaller services that can be independently deployed, tested and scaled. With microservices scaling and deploying each service can be done independently without affecting the other parts of the system, by creating instances of these services across containers or virtual machines. In short a Microservice can be summarized as
“Applications composed of small, independently versioned, and scalable customer-focused services that provides a unique business capability and communicate with each other over standard protocols with well-defined interfaces.”
In the microservice approach the application is divided into smaller parts that communicate with each other with lightweight mechanisms like REST, message brokers etc.
Due to the highly evolving business needs, software applications needs to be build considering high scalability and availability to respond to the needs of customers in an agile way. This is only possible if, making change to a service is less expensive and risky. Microservices make this possible due to the fact that each service is operationally encapsulated by other services and are independently deployable without affecting the other services in the infrastructure. This makes easier for development teams to apply the changes and test them independently faster than ever.

Free white paper


The white paper addresses the common characteristics and challenges with solutions to your journey towards refactoring a monolithic to a microservice. You can download the complete article from this link.

Tuesday, April 21, 2015

Managing your Azure infrastructure as code - part 1 (VM configuration)

Azure PowerShell is a powerful scripting environment that you can use to control and automate the deployment and management of your workloads in Azure. Using Azure PowerShell cmdlet architects and developers can automate every manual and repeated tasks on the Azure infrastructure. Nearly everything you can do manually in the Azure management portal can be done using Azure PowerShell in the Microsoft Azure Automation service. In this blog, we'll see how you can leverage the power of Azure PowerShell cmdlets to create Azure virtual machines with the platform images. To start with, the first step is to create a Azure virtual machine configuration object. The configuration object can be created using the New-AzureVMConfig cmdlets.

This object can then be used to perform a new deployment, as well as to add a new virtual machine to an existing deployment. To create a new virtual machine configuration, we’ll need a name for the virtual machine. We'll start the configuration object by specifying some initial characteristics. Later we'll modify the configuration object with the supporting cmdlets to create a VM. To start with, we'll need a valid name for the VM, the size for the virtual machine and the name of the image to use.
To list all the available worker role sizes you can use the cmdlets Get-AzureRoleSize as given below.

Get-AzureRoleSize | where { $_.SupportedByVirtualMachines -eq $true } | select instancesize

Choose a size from the listed options to use in the configuration.
Next, you’ll need a virtual image name, from the available options. You can use the cmdlet Get-AzureVMImage| Select imagename to list out the image names.
Using this information, you can create an initial configuration object like.

$vmName = “[YOUR_VM_NAME]”
$image = “[YOUR_VM_IMAGE_NAME]”
$azureVMConfig = New-AzureVMConfig -Name $vmName -InstanceSize ExtraSmall -ImageName $image

Next we'll use the Add-AzureProvisioningConfig cmdlet to add a provisioning configuration to the virtual machine. We'll use the Add-AzureProvisioningConfig cmdlet to modify the Azure VM configuration by setting the properties like admin credentials, data disk, endpoints, load balanced set etc. For e.g creating a Windows server, you can extend the command like.

$admin = "[ADMIN_USERNAME]"
$password = "[PASSWORD]"
$azureVM = New-AzureVMConfig -Name $vmName `
-InstanceSize ExtraSmall `
-ImageName $image `
| Add-AzureProvisioningConfig -Windows `
-AdminUsername $admin `
-Password $password

Next, we'll add a new data disk to the virtual machine object. The Add-AzureDataDisk cmdlet can be used to add a new data disk to a virtual machine object. We'll use the CreateNew parameter to create a new data disk with a specified size and label, and then attach it to the configuration. For e.g the below cmdlet Add-AzureDataDisk -CreateNew -DiskSizeInGB 200 -DiskLabel "datadisk1" -LUN 0 will create a new disk with name datadisk1 with an initial size of 200 GB with the logical unit number 0 in the data drive in the machine. We’ll use this details to extend our command like
$azureVM = New-AzureVMConfig -Name $vmName `
-InstanceSize ExtraSmall `
-ImageName $image | `
Add-AzureProvisioningConfig -Windows `
-AdminUsername $admin `
-Password $password | `
Add-AzureDataDisk -CreateNew `
-DiskSizeInGB 200 `
-DiskLabel "datadisk1" `
-LUN 0

Next we'll add a network endpoint to the virtual machine configuration using the Add-AzureEndpoint cmdlet. Endpoints in Windows Azure consist of a protocol, along with a public and private port. The private port is the port that the service is listening on the local computer. The public port is the port that the service is listening on externally. In some cases this is the same port, which is the case for PowerShell. The Add-AzureEndpoint cmdlet is used to add a new endpoint to an azure virtual machine or configuration. While adding an endpoint you can specify a new endpoint that is not load balanced, which will be used only by this virtual machine, or you can specify a load-balanced endpoint, which other virtual machines running in the same cloud service can share to load-balance traffic. You can also specify parameters for an endpoint probe. The probe will be used to check the health of endpoints and endpoint resources, probing for response every 15 seconds, and taking a resource out of rotation if no response is received within 31 seconds. For e.g the command Add-AzureEndpoint -Name "HTTP" -Protocol TCP -LocalPort 80 -PublicPort 80 -LBSetName "HttpLoadbalancedSet" –DefaultProbe will add an endpoint with name HTTP listening on public and private port 80 with default probe option. Let’s extend our command with this option too.

$azureVM = New-AzureVMConfig -Name $vmName `
-InstanceSize ExtraSmall `
-ImageName $image | `
Add-AzureProvisioningConfig -Windows `
-AdminUsername $admin `
-Password $password | `
Add-AzureDataDisk -CreateNew `
-DiskSizeInGB 200 `
-DiskLabel "datadisk1" `
-LUN 0 | `
Add-AzureEndpoint -Name "HTTP" `
-Protocol TCP `
-LocalPort 80 `
-PublicPort 80 -LBSetName "HttpLoadbalancedSet" `
–DefaultProbe

If you want to add more endpoints you can pipe more endpoints to the configurations based on your need. For e.g Add-AzureEndpoint -Protocol TCP -LocalPort 443 -PublicPort 443 -Name 'LBHTTPS' -LBSetName 'LBHTTPS' -ProbePort 443 -ProbeProtocol https -ProbePath '/'

Using this information, you can now create your VM by using a unique cloud service name like.

New-AzureVM -ServiceName [YOUR_CLOUD_SERVICE_NAME] -VMs $azureVM

Sunday, August 17, 2014

Continuous Delivery – Patterns for zero downtime requirements (ARR setup)

Microsoft Application Request Routing (ARR) is a proxy-based routing module that forwards HTTP requests to application servers based on HTTP headers, server variables, and load balance algorithms. With ARR you can increase application availability and scalability by better utilization of content server resources with lower management cost by creating opportunities for shared hosting environments.

ARR relies on the URL rewrite module to inspect incoming HTTP requests to make the routing decisions. Therefore, the URL rewrite module is required to enable ARR features. Using ARR in a shared hosting environment introduces a new deployment architecture that provides additional benefits and opportunities for shared hosting. This scenario is enabled by a feature called host name affinity. The host name affinity feature in Application Request Routing enables shared hosting to rethink how sites are deployed. Application Request Routing affinitizes the requests, regardless of whether they are made from one client or multiple clients, to one server behind ARR, ensuring that a given site is consuming resources only on one of the servers.

For e.g. in the diagram the ARR load balances the request to one of the server and affinitizes the request for a DNS to the same server for the lifespan of corresponding worker process. Requests are sent to one of the server and responses are returned for the request. As you can see the load balancing is dynamically taken care by ARR which will help the administrators to scale the environment horizontally by adding new servers without predefined site allocations, by the flexibility of managing the shared configuration in a single place.

In this post we'll see how we can configure ARR in a shared hosting environment and thus make use of the features for a zero downtime deployment scenario when doing CD in your organization.

The first step is to create a server farm with the application servers that are configured with shared configuration and content. The sites on the application server should be using host name binding as follows:

  • Open server affinity from the server farm in ISS.

  • Enable host name affinity by using the host name and click Apply.

There are two providers available for this option.
  1. Microsoft.Web.Arr.HostNameRoundRobin tries to evenly distribute the number of affinitized host name in round robin. Using this provider has no requirements on the application servers.
  2. Microsoft.Web.Arr.HostNameMemory tries to distribute the number of affinitized host names based on the amount of available memory on the application servers where the server with the most amount of available memory would be assigned with the next host name.
  • Click on Apply from the Actions on right side to save the changes
  • Next to specify the number of servers to be used per host name, Select Advanced settings in the Server Affinity page and enter values for the host name and number of allocated servers.

  • Click OK to save the changes. Now you have successfully configured the host name affinity feature in ARR for a shared hosting scenario. SSL offloading is enabled by default in the Routing rules section. You can disable this and thus make all communications to be encrypted between servers. To disable SSL offloading uncheck the Enable SSL offloading checkbox in the Routing rules page.
  • To setup your website for zero downtime requirement, first you need to create an ARR site where the users connect to. To create an ARR site, create an empty website in ISS and put it in its own application pool and set the non-timeout requirements on the app pool.
  • Create two websites that will actually host the content. Make sure that these sites have a different IP address and on a different port than the ARR site. Assign these sites to their own application pools and use different virtual directories for the content.
  • On the server farm that was configured in step 1, add the servers create and change the http port to the port of the websites in the advanced settings as given below.

  • In the IIS manager, open URL rewrite rules and click on the ARR rule created for your configuration

  • Add a new condition for the {SERVER_PORT} does not match <> and click on OK. Apply your changes to the server.

  • That completes the configuration for ARR and URL redirect for your website from the ARR site. You can now use this configuration to deploy a new version of your application to the severs by drain stopping one of them and then warm-up the offline site after deployment by using the alternate IP address. Repeat the process for the second server and then complete the deployment process without a downtime.


Sunday, July 27, 2014

Continuous Delivery – Patterns for zero downtime requirements

One of the main problems teams face when practicing continuous delivery is to manage zero downtime deployments to the production environments. The goal is to deploy as soon as possible and depending on the heartbeat of the organization, this becomes a higher priority to manage active users without losing their data and sessions during a deployment process. In this post I'll share some of the ideas and approaches that are been used for achieving the goal of zero downtime deployments.

An important process for reducing risks and managing a zero deployment downtime is by following the blue-green deployment technique. In a blue-green deployment scenario, the approach is to bring up a parallel green environment and once everything is tested and ready to go, you simply switch all the traffic to the green environment and leave the blue environment idle. This also helps in easy rollback and switch to the blue environment if anything goes wrong in the current installation.


In a horizontally scaled environment, where you have multiple servers handling the load where the traffic is routed to one of the servers based on the load balancer scheduling algorithm, you can update the servers one-by-one and bring them online after the updates. The same approach will be used in this scenario also, but with the only difference that there will be N blue and N-1 green servers where N is the number of servers in each group in the web farm.


As long as deployment of application code is only considered, there is no problem managing that with a zero downtime requirement. But consider the deployment scenario which involves changes in the database schema as well. You can’t now update the DB schema first and continue using the old application code to use the new schema as it will create inconsistencies considering the code is written to work on an old DB schema. This involves taking extra precautions or considerations with updates that involve DB schema changes. When it involves database changes two approaches that helps the most are:

Strive for backward compatibility by performing schema changes that won't affect the existing code and also by ensuring that the deployed code can work with the old schema.
Some of the points to consider would be to:
  • Perform schema changes in a way that won’t break existing code
  • New columns added are always NULLABLE
  • New columns provide a default value if it does not exist.
  • Don't delete columns until none of the code uses them, or can handle their absence.
  • Use triggers or similar mechanisms to populate values that are important for one deployed version of the application.
  • Enforce referential integrity only when it makes sense.

Have an expansion and contraction database script:
This allows you to handle database changes that are safe to apply without breaking backward compatibility with the application code. Changes like creating new tables, adding columns or tweaking indexes etc. can be handled using the expansion scripts with a trigger or scripts that fills the default values. Once the application code is updated, you can execute the contraction script to clean up any database structure or data that is no longer needed.
You should plan to execute the expansion scripts prior to updating the application code and the contraction scripts once the application code has been updated and is in a stable state. This produces a nice benefit of decoupling database migrations from application deployments.

Sunday, May 12, 2013

CQRS Simplified - Part 2 (Commands & Command Handlers)


Every imperative operation in the system represents a command in CQRS. A Command is simply a DTO-type of object that contains the data necessary to make one specific change to the state of the system. The service method that accepts a command does not returns any values. In case of WCF services, if the command execution failed, a fault contract exception is thrown. The method that accepts the command is responsible for validating the command via a command validator object (remember SRP :)) before passing it to a handler object to execute the command.

Below is an example of a DTO that encapsulates the command information in our sample. Note that the commands have an Identity object in our sample.
public class RespondToRsvpCommand : ICommand
{
    public Guid RsvpReferenceId { get; set; }
    public bool Response { get; set; }


    public override string ToString()
    {
        return "Respond to RSVP";
    }
}

The command handlers are responsible for executing the commands. You can normally group commands to an aggregate in a command handler as given below.

public class RsvpCommandHandler : ICommandHandler<RespondToRsvpCommand>, ICommandHandler<ConfigureRsvpCommand>,
                                    IDependencyResolver
{
    [InjectionConstructor]
    public RsvpCommandHandler()
    {
        ResolveDependencies();
    }

    private ICommandValidator<RespondToRsvpCommand> RespondToRsvpCommandValidator { get; set; }

    private ICommandValidator<ConfigureRsvpCommand> ConfigureRsvpCommandValidator { get; set; }

    public void Process(RespondToRsvpCommand command)
    {
        //RSVP processing logic goes here
    }

    public bool Validate(ConfigureRsvpCommand command)
    {
        return true;
    }

    public void Process(ConfigureRsvpCommand command)
    {
        //throw new NotImplementedException();
    }

    public bool IsValid(RespondToRsvpCommand command)
    {
        return RespondToRsvpCommandValidator.Validate(command);
    }

    public bool IsValid(ConfigureRsvpCommand command)
    {
        return ConfigureRsvpCommandValidator.Validate(command);
    }

    public void ResolveDependencies()
    {
        RespondToRsvpCommandValidator = Container.Current.Resolve<ICommandValidator<RespondToRsvpCommand>>();
        ConfigureRsvpCommandValidator = Container.Current.Resolve<ICommandValidator<ConfigureRsvpCommand>>();
    }
}

As you can see, I've used the ICommandValidator instances to validate the respective commands in the context. I've also used the unity dependency container as my dispatcher object to dispatch the respective command handlers.

Next : Events

Sunday, May 5, 2013

CQRS Simplified – Part 1 (Introduction)


CQRS is an object oriented architectural pattern built on the principle that every method should either be a command that performs an action, or a query that returns data to the client, but not both.

A typical CQRS scenario involves 2 DB's, a write DB which is used to store transitional data for long running processes.  For a process where a service expects multiple messages, it needs a way to temporary store data before the all the messages arrives. For e.g. to make a customer a preferred customer needs an approval from the management, which takes some time to process the request. The service will need a temporary storage for the preferred customer state change request till the approval comes. The write DB is used to store these kinds of data. The Read DB is not updated till the approval comes.

When the approval finally comes, the service will take the customer information from the write DB, complete the registration process and write it to the read DB. At this time, the temporary customer information in the write DB has done its job and can be removed from the write DB. For simpler process such as change customer first name, the change can be written to the read DB right away. Writing to the write DB is not required because there is no temporary data in this case.

This simple approach brings following benefits (from Rinat Abdullin's blog)
  • Denormalized query persistence is optimized for the reads (which usually make up the most of the persistence IO) resulting in better performance and user experience;
  • We can optimize our read side for the needs of the UI (i.e.: fetching dashboard for the user in a single query) which will result in better development experience and less risk of breaking something on the write side.
  • Read side can be put on some cloud storage, which is inherently optimized for the reads, could be partitioned, replicated and even distributed via CDN;
  • By offloading data reads to synchronous queries we automatically increase the performance of the write side - now it has lower stress and lower probability of hitting a deadlock

This blog is an attempt to implement the principles of CQRS in a very simple way, for demonstrating the concepts of CQRS like:
  • Commands
  • Command Handlers (validation and execution)
  • Queries
  • Query parameters and Query results
  • Command Dispatchers.

Wednesday, July 18, 2012

Cassandra Architecture - Data Partitioning


Before starting a Cassandra cluster, you must choose how the data will be divided across the nodes in the cluster. This involves choosing a partitioner for the cluster. Cassandra uses a ring architecture. The ring is divided up into ranges equal to the number of nodes, with each node being responsible for one or more ranges of the overall data. Before a node can join the ring, it must be assigned a token. The token determines the node’s position on the ring and the range of data it is responsible for.
Once the partitioner is chosen it is unlikely to change the configuration choice without reloading all the data. This makes it very important to choose and configure the correct partitioner before initializing the cluster.
The important distinction between the partitioners is order preservation (OP). Users can define their own partitioners by implementing IPartitioner, or they can use one of the native partitioners.

Random Partitioner
RandomPartitioner  is the default choice for cassandra as it uses an MD5 hash function to map keys into tokens. These keys will evenly distribute across the clusters. The row key determines where the node placement.  Consistent hashing algorithm used by Random partioning ensures that when nodes are added to the cluster, the minimum possible set of data is affected. The hashing algorithm creates an MD5 hash value of the row key ranging from 0 to 2*127. Then nodes in the cluster are assigned a token that represents the hash value in the above mentioned range. This value determines the row keys to be placed in the node. For e.g the below given row with row key ‘Prajeesh’ is assigned a hash key like 98002736AD65AB which determines the node that holds the range to store the row.
Prajeesh
India
Scrum Master
Prowareness

Notice that the keys are not in order. With RandomPartitioner, the keys are evenly distributed across the ring using hashes, but you sacrifice order, which means any range query needs to query all nodes in the ring.

Ordered Preserving Partitioners
The Order Preserving Partitioners preserve the order of the row keys as they are mapped into the token space. This allows range scans over rows, meaning you can scan rows as though you were moving a cursor through a traditional index. For example, if your application has user names as the row key, you can scan rows for users whose names fall between Albert and Amy. This type of query would not be possible with randomly partitioned row keys, since the keys are stored in the order of their MD5 hash (not sequentially).
An advantage of using OPP is that the range queries are simplified since the query need not consult each node in the ring the fetch the data. It can directly visit the node based on the order of row keys.
A disadvantage of using OPP is that the ring becomes unstable over a time if your application tends to write or update a sequential block of rows at a time, then the writes will not be distributed across the cluster, putting it all to a node. This makes one node holding more data than the rest disturbing the even distribution of data across nodes. 

Friday, December 9, 2011

Aspect Oriented Programming and Interceptor pattern - Creating a Session handler for ASP.NET


Interceptor pattern can be used for addressing cross cutting concerns in the application that happens at either the beginning or end of a method. For e.g. checking the validity of the input parameters before executing the method and throwing exceptions, catching and logging exceptions etc. These situations can be encapsulated in a reusable component that can be processed by the compiler and produce executable code (AOP).
Unity allows developers to implement the idea of interception by allowing creation of objects that can add some extra code on the target method before or after the regular execution of these target methods. In this post, I'll show how to create a Session handler for ASP.Net using the interface interception mechanism provided by unity application block, that will allow you to address encapsulate the logic for checking session for a value before execution of the method and returning back the value from session if available. The same handler can be used to also add the return value to the session if not available so that this value can be retrieved next time.
Creating the session handler
public class SessionHandler : ICallHandler
{
    private readonly string _sessionKey;

    public SessionHandler(string sessionKey)
    {
        _sessionKey = sessionKey;
    }

    public ISessionService SessionService
    {
        get { return Container.Instance.Resolve<ISessionService>(); }
    }

    public IMethodReturn Invoke(IMethodInvocation input, GetNextHandlerDelegate getNext)
    {
        if (SessionService.Contains(_sessionKey))
        {
            input.CreateMethodReturn(SessionService.Get(_sessionKey));
            return getNext()(input, getNext);
        }

        var returnValue = getNext()(input, getNext);
        SessionService.Add(_sessionKey, returnValue.ReturnValue);
        return returnValue;
    }

    public int Order { get; set; }
}

The session handler uses the session service which encapsulates the actual Session object to add/ remove values from the session.  You can also use the HttpContext.Current.Session object here.
Creating the Attribute for the handler
public class SessionDependencyAttribute : HandlerAttribute
{
    private readonly string _sessionKey;
       
    public SessionDependencyAttribute(string sessionKey)
    {
        _sessionKey = sessionKey;
    }

    public override ICallHandler CreateHandler(IUnityContainer container)
    {
        return new SessionHandler(_sessionKey);
    }
}

Creating a service and using the SessionHandler we created.
public interface IMockService
{
    [SessionDependency("TestKey")]
    string GetValue(bool flag);
}

public class MockService : IMockService
{
    public string GetValue(bool flag)
    {
        return flag ? "True" : "False";
    }
}

Configuring the Unity container
_container = new UnityContainer();
_container.AddNewExtension<Interception>();


_container
    .RegisterType<ISessionService, SessionService>()
    .RegisterType<IMockService, MockService>()
    .RegisterType<MockPresenter>()
    .Configure<Interception>().SetDefaultInterceptorFor<IMockService>(new InterfaceInterceptor());

Test cases
[TestMethod]
public void MethodShouldReturnValueFromSessionIfValueDoesNotExistsAndAddToSession()
{
    var service = Container.Instance.Resolve<IMockService>();
    var actual = service.GetValue(true);

    Assert.IsTrue(SessionService.Contains("TestKey"));
}

Wednesday, September 14, 2011

Continuous Deployment – Automating ASP.Net web deployment using TeamCity and MSBuild

Of all the Lean Startup techniques, Continuous Deployment is by far the most controversial. Continuous Deployment is a process by which software is released several times throughout the day – in minutes versus days, weeks, or months. Continuous Flow Manufacturing is a Lean technique that boosts productivity by rearranging manufacturing processes so products are built end-to-end, one at a time (using singe-piece flow), versus the more prevalent batch and queue approach.
Continuous Deployment is Continuous Flow applied to software. The goal of both is to eliminate waste. The biggest waste in manufacturing is created from having to transport products from one place to another. The biggest waste in software is created from waiting for software as it moves from one state to another: Waiting to code, waiting to test, waiting to deploy. Reducing or eliminating these waits leads to faster iterations which is the key to success.” – Eric Ries

Continuous deployment is one of the new trends in agile development that ensures release of software in a faster and reliable manner. It also helps the team to deliver value to customers early and often. In this post I’ll show how to setup a continuous integration environment using TeamCity and MSBuild scripts created by using a Web deployment project deploy your website every time a check in happens into the source safe.

TeamCity is a user-friendly continuous integration (CI) server from jet brains that is available as a free download from the vendor website. You can use go to the website http://www.jetbrains.com/teamcity/ to get your free copy. I have also used the Web deployment project from MS for MSBuild script generations in this sample.

For setting up the automated deployment on a website, you can follow the below given steps.
  • Right click on the web application project for automated build and select Add Web Deployment Project

  • On the ‘Add Web Deployment Project’ dialog give an appropriate name for the deployment project and press OK. This web deployment project created for the web application is the build scripts for MSBUILD.

  • Next we can create the build configuration setup for the project. For this right click the solution and select Configuration manager.
  • Unselect the build option for ‘Debug’ and ‘Release’ configurations for the Deployment project.

  • On the Active solution configuration drop down select ‘New’

  • On the ‘New Solution Configuration’ dialog, enter the name for the deployment configuration and press OK. Close the configuration manager window by selecting Close.

  • Next we’ll create separate configuration options for staging environment. For e.g. the connection strings for the staging server will be different that the development environment. Right click the web application and add a new folder ‘Configuration’
  • In the Configuration folder add a new configuration file ‘ConnectionStrings.Staging.Config’ and include the connection strings for the staging environment in this file. These settings will be replaced with the connection strings section in the web.config file when the deployment is started.

  • We’ll now setup the deployment properties for the project. For that, right click the deployment project and select property pages.
  • Change the output folder to the location where the build output will be deployed to.

  • On the deployment section of the property pages, you can set transformations on the configuration options for the application. You can also mention the virtual directory options on this page. Save the settings by selecting OK.

  • Next we have to configure the project on Team city. Login to team city as administrator and navigate to the Administration tab. On the administration page, select ‘Create Project’. Give an appropriate name for the project and select ‘Create’ option on the page.

  • Next we have to configure the VSC settings used by TeamCity to obtain the source files for the build. For this select the VCS roots tab and click on ‘Create VCS roots’.
  • Select the type of source control from the ‘Type of VCS’ dropdown to enter the source control specific configuration entries. Enter the URL, username, password and other details for the sub version and click on Create to update the configuration information.

  • On the general tab, select ‘Create new build configuration’ to enter details for the build configuration. Enter a name for the build configuration and select VCS settings to continue.
  • On the next page enter details for the checkout directory and Select ‘Add build Step’.
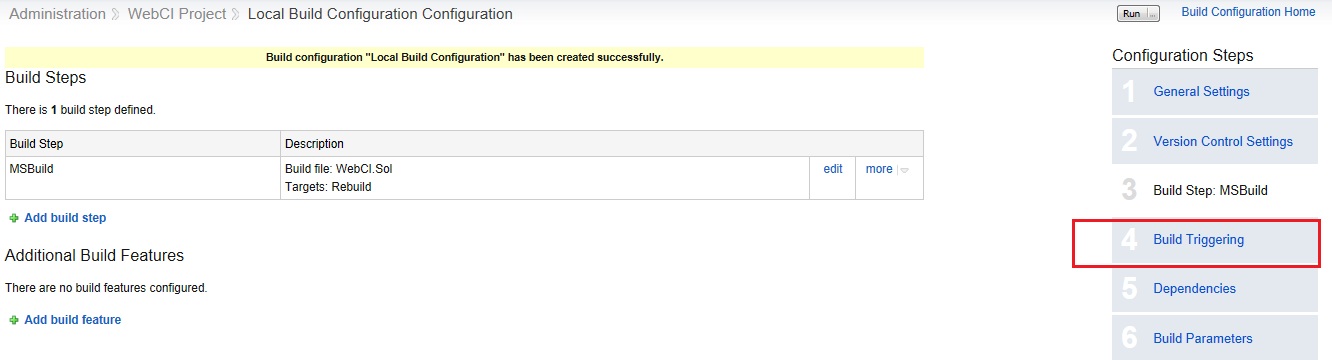
  • Select MSBuild as the build runner and enter the name of solution as the Build file path option.

  • On the build triggering, select ‘Add new trigger’. And select VCS trigger to trigger the build on every check in done to the source safe. 


  • Select Save and you have successfully created an automated build setup for your web application.