Showing posts with label PRISM. Show all posts

Wednesday, February 16, 2011

Silverlight, PRISM, MVVM, MEF – Part 7

Regions in Prism have been extended to support a more general notion of navigation, based on URIs and an extensible navigation mechanism.
Navigation within a region means that a new view is to be displayed within that region. The view to be displayed is identified via a URI, which, by default, refers to the name of the view to be created. You can programmatically initiate navigation using the RequestNavigate method defined by the INavigateAsync interface.
RegionManager in prism have a RequestNavigate method which allows you to specify the name of the region to be navigated. This convenient method obtains a reference to the specified region and then calls the RequestNavigate method, as shown in the code.
private void OnViewNavigationRequested()
{
    _regionManager.RequestNavigate("MainRegion"
        , new Uri("EmployeeView1", UriKind.Relative)
        , (navigationResult) =>
        {
            if (navigationResult.Result == true) MessageBox.Show("Success");
            else MessageBox.Show("Failed");
        });
}
The views need to be registered with the region for navigation to work.
[Import]
public EmployeeView1 View1 { get; set; }

[Import]
public EmployeeView2 View2 { get; set; }

public void Initialize()
{
    CreateNavigationTabAndRegisterModule();
    RegisterViewsWithRegion();
}

private void RegisterViewsWithRegion()
{
    _regionManager.RegisterViewWithRegion("MainRegion", () => View1);
    _regionManager.RegisterViewWithRegion("MainRegion", () => View2);
}

View and View Model Participation in Navigation
The INavigationAware interface is implemented by the View and ViewModel to participate in the navigation process. The interface defines the methods
public interface INavigationAware
{
     bool IsNavigationTarget(NavigationContext navigationContext);
     void OnNavigatedFrom(NavigationContext navigationContext);
     void OnNavigatedTo(NavigationContext navigationContext);
}
The OnNavigatedFrom method can be implemented to save the state of the currently active view or viewmodel before navigation. Similarly OnNavigatedTo method can be used to find details of the view or viewmodel navigated to.
If you want to confirm the navigation from the view, the IConfirmNavigationRequest interface can be implemented on the View or ViewModel to confirm the navigation request. The navigation can be canceled or confirmed based on the logic implemented in the ConfirmNavigationRequest method.
public void ConfirmNavigationRequest(NavigationContext navigationContext, Action<bool> continuationCallback)
{
    if (MessageBox.Show("Confirm navigation from this view?", "Confirm navigation", MessageBoxButton.OKCancel) == MessageBoxResult.OK)
        continuationCallback(true);
    else
        continuationCallback(false);
}

Sunday, February 13, 2011

Silverlight, PRISM, MVVM, MEF – Part 6

In Prism, loosely coupled components in the application communicate with each other using a event aggregation service that the library provides. The event aggregator service uses a publish/subscribe mechanism for communication. The EventAggregator provides multicast publish/subscribe functionality. This means there can be multiple publishers that raise the same event and there can be multiple subscribers listening to the same event as given below.

In prism communication between publishers and subscribers is done by the CompositePresentationEvent class. This class maintains the list of subscribers and handles event dispatching to the subscribers.
The CompositePresentationEvent class is a generic class that requires the payload type to be defined as the generic type. This helps enforce, at compile time, that publishers and subscribers provide the correct methods for successful event connection.
Event creation is done by creating a class that inherits the CompositPresentationEvent class.
public class EmployeeAddedEvent : CompositePresentationEventEmployee> { }

Publishers raise an event by retrieving the event from the EventAggregator and calling the Publish method. To access the EventAggregator, you can use dependency injection by adding a parameter of type IEventAggregator to the class constructor. For e.g.
private void OnAddNewClicked()
{
    AddNewEmployeeAndPassToEmployeeView();
}

private void AddNewEmployeeAndPassToEmployeeView()
{
    Model.Employee employee = new Model.Employee
    {
            Id = Guid.NewGuid(),
            FirstName = "New Employee",
            LastName = "Last Name",
            ChangedDate = DateTime.Now,
            CreatedDate = DateTime.Now,
            DateOfJoining = DateTime.Now
    };
    _eventAggregator.GetEvent<EmployeeAddedEvent>().Publish(employee);
}

Subscribers can enlist with an event using one of the Subscribe method overloads available on the CompositePresentationEvent class. In our sample, you can use the event subscription as
private void SubcribeToEmployeeAddedEvent(IEventAggregator eventAggregator)
{
    EmployeeAddedEvent employeeAddedEvent = eventAggregator.GetEvent<EmployeeAddedEvent>();

    if (_subscriptionToken != null)
        employeeAddedEvent.Unsubscribe(_subscriptionToken);
    _subscriptionToken = employeeAddedEvent.Subscribe(OnEmployeeAddedEvent, ThreadOption.UIThread, false);
}

public void OnEmployeeAddedEvent(Model.Employee employee)
{
    Employees.Add(employee);
}

If your subscriber no longer wants to receive events, you can unsubscribe by using your subscriber's handler or you can unsubscribe by using a subscription token.
The following code example shows how to directly unsubscribe to the handler.
employeeAddedEvent.Unsubscribe(OnEmployeeAddedEvent);

Wednesday, February 2, 2011

Silverlight, PRISM, MVVM, MEF – Part 5

Authentication in Silverlight applications that use WCF RIA services can make use of the WCF RIA services authentication framework. WCF RIA Services builds upon the ASP.NET Membership framework by exposing the Membership framework to rich Internet clients through the authentication domain service. After adding an authentication domain service, you can enable the following functions:
  • Authentication - to verify a user's credentials and mark the user as logged in or logged out.
  • Roles - to group users by responsibilities and grant resource permissions to authenticated members of a group.
  • Profiles - to retain properties for authenticated users and retrieve those properties in your application.

This post demonstrates how to enable user authentication in your prism application using RIA services.
RIA Services provides the authentication domain service template to facilitate authentication on the presentation tier. The authentication domain service derives the AuthenticationBase class which contains the profile properties for the authenticated user. This service is accessed via the WebContext class which is automatically generated by the RIA services. You can also create your custom implementation for the membership provider and configure the service to use this instead of the default provider.
For e.g.:
public class BlogsPrajeeshMembershipProvider : MembershipProvider
{
    public override string ApplicationName
    {
        get
        {
            return "BlogsPrajeesh.PrismSamples";
        }
        set { }
    }

    //Other methods…

    public override bool ValidateUser(string username, string password)
    {
        if (username == "Prajeesh" && password == "Password") return true;
        return false;
    }
}

Configuring the membership provider in the Web.config file.
<system.web>
  <httpModules>
    <add name="DomainServiceModule" type="System.ServiceModel.DomainServices.Hosting.DomainServiceHttpModule, System.ServiceModel.DomainServices.Hosting, Version=4.0.0.0, Culture=neutral, PublicKeyToken=31bf3856ad364e35" />
  httpModules>
  <compilation debug="true" targetFramework="4.0">
    <assemblies>
      <add assembly="System.Data.Entity, Version=4.0.0.0, Culture=neutral, PublicKeyToken=b77a5c561934e089" />
    assemblies>
  compilation>
  <authentication mode="Forms" />
  <membership defaultProvider="BlogsPrajeeshMembershipProvider">
    <providers>
      <add name="BlogsPrajeeshMembershipProvider" type="BlogsPrajeesh.PrismSamples.Web.BlogsPrajeeshMembershipProvider, BlogsPrajeesh.PrismSamples.Web"/>
    providers>
  membership>
system.web>

To use this authentication service in the Silverlight client, configure the WebContext in App.xaml.cs file as
public App()
{
    this.Startup += this.Application_Startup;
    this.Exit += this.Application_Exit;
    this.UnhandledException += this.Application_UnhandledException;

    InitializeComponent();

    WebContext context = new WebContext();
    context.Authentication = new FormsAuthentication();
    ApplicationLifetimeObjects.Add(context);
}
Later in the Shell
public Shell()
{
    InitializeComponent();
    this.Loaded += new RoutedEventHandler((x, y) =>
    {
        if (WebContext.Current.Authentication.User != null && !WebContext.Current.Authentication.User.Identity.IsAuthenticated)
            {
                RegionManager.Regions["LoginRegion"].Add(LoginView, "LoginView");
                RegionManager.Regions["LoginRegion"].Activate(LoginView);                    
            }
    });
}
The LoginViewModel code that authenticates the user
[Export(typeof(LoginViewModel))]
[PartCreationPolicy(CreationPolicy.NonShared)]
public class LoginViewModel : NotificationObject
{
    [ImportingConstructor]
    public LoginViewModel(IRegionManager regionManager)
    {
        _regionManager = regionManager;
        LoginCommand = new DelegateCommand(() => PerformLogin());
        this.PropertyChanged += new System.ComponentModel.PropertyChangedEventHandler((x, y) => RaiseCommandChanged());
    }

    private void RaiseCommandChanged()
    {
        LoginCommand.RaiseCanExecuteChanged();
    }

    private void PerformLogin()
    {
        var webContext = WebContext.Current;
        webContext.Authentication.Login("Prajeesh", "Password");
        webContext.Authentication.LoggedIn += new EventHandler((x, y) =>
        {
            var loginView = _regionManager.Regions["LoginRegion"].GetView("LoginView");
            _regionManager.Regions["LoginRegion"].Remove(loginView);
        });
    }

    //Other methods…

}

Wednesday, January 19, 2011

Silverlight, PRISM, MVVM, MEF – Part 4

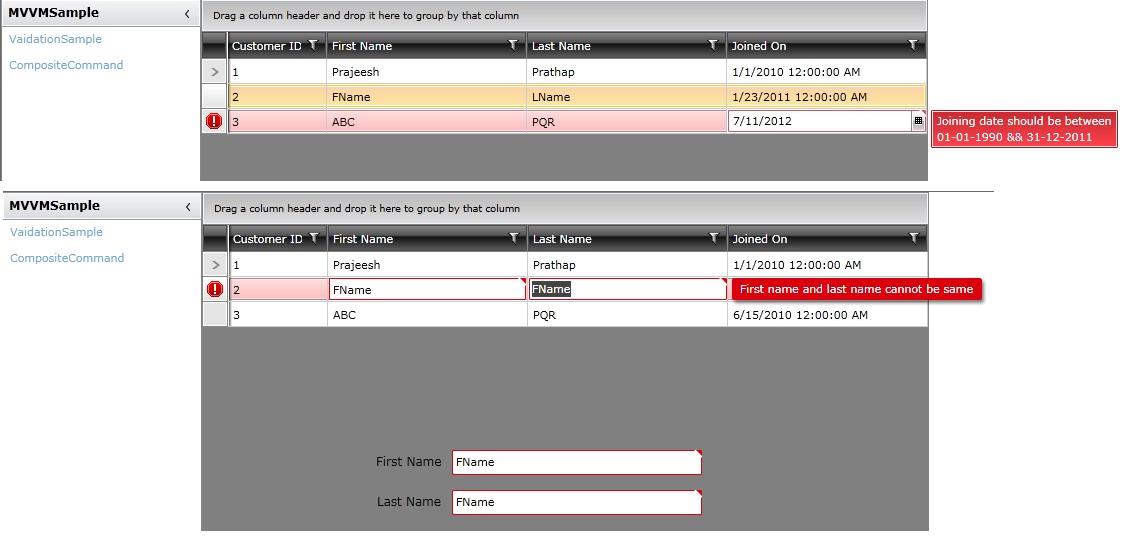
In my previous post http://blogsprajeesh.blogspot.com/2011/01/silverlight-prism-mvvm-mef-part-3.html, I explained how to add validation metadata to entities and perform data validation on views in the prism application. The standard validation attributes that ship in the System.ComponentModel.DataAnnotations assembly can cover many common validation scenarios. But if you want to do perform custom validations on the business logic, you need to use the CustomValidationAttribute to implement the validation logic. Like the standard validation attributes, it also allows you to specify an ErrorMessage and the properties that failed the validation. 
Custom validations can be implemented in a separate class which has static methods that perform the validation. For e.g
[MetadataTypeAttribute(typeof(Customer.CustomerMetadata))]
public partial class Customer
{
    [CustomValidation(typeof(CustomerRules), "ValidateCustomer")]
    internal sealed class CustomerMetadata
    {
        private CustomerMetadata()
        {
        }       

        [CustomValidation(typeof(CustomerRules), "IsValidJoiningDate")]
        public DateTime? DateOfJoining { get; set; }
    }
}

The above sample code has custom validations implemented on entity and property level. The validation rules are implemented in the CustomerRules class which is shared between the server and the client.
public class CustomerRules
{
    public static ValidationResult ValidateCustomer(Customer customer, ValidationContext context)
    {
        if (string.Compare(customer.FirstName, customer.LastName, StringComparison.OrdinalIgnoreCase) == 0)
            return new ValidationResult("First name and last name cannot be same", new string[] { "FirstName", "LastName" });
        return ValidationResult.Success;
    }

    public static ValidationResult IsValidJoiningDate(DateTime? joiningDate, ValidationContext context)
    {
        if (joiningDate.HasValue)
        {
            if(joiningDate.Value.Year < 1990 || joiningDate.Value.Year > 2011)
                return new ValidationResult("Joining date should be between 01-01-1990 && 31-12-2011", new string[] { "DateOfJoining"});
        }
        return ValidationResult.Success;
    }
}
In the client code XAML, you just need to set the NotifyOnValidationError property to True to notify the user on validation errors
<TextBox Text="{Binding CurrentCustomer.FirstName, Mode=TwoWay, NotifyOnValidationError=True}" Grid.Column="1" Grid.Row="2" Width="250" Height="25" HorizontalAlignment="Left" />
<TextBox Text="{Binding CurrentCustomer.LastName, Mode=TwoWay, NotifyOnValidationError=True}" Grid.Column="3" Width="250" Height="25" HorizontalAlignment="Left" Grid.Row="3" />
<Button Grid.Row="4" Content="Add" prism:Click.Command="{Binding AddCustomerCommand}" Width="120" HorizontalAlignment="Right" />
<telerik:RadGridView HorizontalAlignment="Left" Grid.ColumnSpan="2" Name="radGridView1" VerticalAlignment="Top" ItemsSource="{Binding Customers}" SelectedItem="{Binding CurrentCustomer, Mode=TwoWay}" AutoGenerateColumns="False">
    <telerik:RadGridView.Columns>
        <telerik:GridViewDataColumn DataMemberBinding="{Binding Id, NotifyOnValidationError=True, Mode=TwoWay}" IsReadOnly="True" Header="Customer ID" Width="100" />
        <telerik:GridViewDataColumn DataMemberBinding="{Binding FirstName, NotifyOnValidationError=True, Mode=TwoWay}" Header="First Name" Width="200" />
        <telerik:GridViewDataColumn DataMemberBinding="{Binding LastName, NotifyOnValidationError=True, Mode=TwoWay}" Header="Last Name" Width="200" />
        <telerik:GridViewDataColumn DataMemberBinding="{Binding DateOfJoining, NotifyOnValidationError=True, Mode=TwoWay}" Header="Joined On" Width="200" />
    telerik:RadGridView.Columns>
telerik:RadGridView>

Output