Showing posts with label ALM. Show all posts

Thursday, June 7, 2018

My new course : Continuous Delivery with Visual Studio Team Services published


Over the last 3 months I was busy working on my course on Continuous Delivery with Visual Studio Team Services

The course is published by Packt - a leading UK provider of Technology eBooks, Videos and Blogs, and their editors and marketing department has done a fantastic job of helping me with with creative graphics and animations to bring life to this course.


This course is intended for software development professionals who want to learn about Continuous Delivery in a technical value stream as supported by Visual Studio Team Services in order to continually deliver working software at scale. You'll learn how to create, build, test and release a containerized ASP.NET web api to kubernetes cluster on Azure.


The course consists out of seven sections:
  • Introduction to continuous delivery - We'll learn about Continuous Delivery, the business goals and principles of Continuous Delivery
  • Introduction to visual studio team services - We'll learn about the different elements of Visual Studio Team Services and how they function and how using these connected tools you can move your organization to a full-fledged continuous delivery implementation.
  • Setting up the development environment for .net core applications using Docker:
  • Source code management in VSTS : We'll have a look into the Git version control in VSTS and discuss branching strategies like trunk based development and how these concepts relate to continuous delivery.
  • Build management in VSTS : We'll see how to setup a Continuous integration build in VSTS that helps the code stay robust enough that team members can fearlessly make changes to the code base without worrying about breaking existing functionality.
  • Continuous testing : This section we’ll learn how to ensure that an application's components function correctly when assembled together. We'll see how to automate the tests and include them in your Continuous Integration scheme to get the most value from the tests.
  • Release management in VSTS : This section shows you how to do automatic deployments by using Release Management. You'll learn Release Management in VSTS, how it works and how to use release management to deploy our sample application to a Kubernetes cluster on Azure.

The course follows a phased approach to continuous delivery to automate build, deploy and management of .net core applications to Azure Container Services using VSTS ALM. By the end of this course, you'll have the necessary knowledge to create a fully automated build and release pipeline using Visual Studio Team Services for your .NET applications. And don't forget to check the course at https://www.packtpub.com/virtualization-and-cloud/continuous-delivery-visual-studio-team-services-video

Wednesday, April 2, 2014

DevOps - Remote test execution

Developers can configure visual studio to run tests remotely and concurrently on a configured test controller and agent groups. The architecture should consist of developer machines with VS 2013, at least one test controller with test agents.

The test controller should be installed and configured with a test account that will be used to login to the controller service. The test controller manages a set of test agents to run tests. The test controller communicates with test agents to start, stop and collect test execution result.

Similarly the agents runs as a service that listens for requests from the test controller to start a new test. When a request is received, the test agent service starts a process on which to run the tests. Each test agent runs the same test. As part of agent configuration it is important to register it with a controller.

To setup remote execution of tests from Visual Studio, you need to add a new test settings file and set the test execution method to 'Remote execution'.


After setting the execution mode, now you can associate the tests with a controller by managing controller and agents from the settings window and start execution of the tests on the remote agent.

DevOps - Workbench deployment orchestration

DevOps Deployment Workbench offers customized XAML workflow templates that are designed to encapsulate many smaller individual deployment steps into a singular consistent workflow. Using the DevOps workbench you can create deployment Activities that offer many smaller coded XAML activities that perform distinct build or deployment tasks, such as updating of a value in an XML configuration document. All these activities can be later executed from the workbench UI to perform a deployment activity.
In this article we'll use the workbench UI to create a deployment orchestration and use this to perform a deployment activity.
  • From the DevOps workbench UI, create a new Deployment Orchestration as given below.

  • This creates a master deploy sequence which you can customize and extend by adding custom activities that describes your deployment process
  • From the properties box, change the master deploy sequence display name to your project deployment sequence name.

  • The deployment toolbox contains common deployment activities which you can use in your deployment sequence by dropping them to your activity
  • To start with the sample deployment scenario, we'll add a pre check for a valid operating system before copying the assemblies to the server.
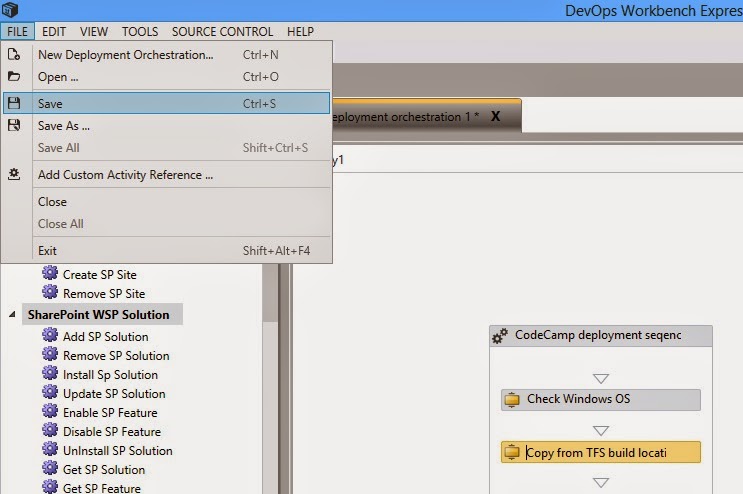
  • From the toolbox, drag and drop the CheckOSName activity to the deployment sequence

  • From the toolbox drag and drop the .Net application deployment activity to the sequence and provide details for source and target as given below

  • Save your orchestration to the disk

  • We'll now use this initial deployment sequence to deploy to a test server from the workbench UI.
  • For adding a new target server connection, choose Target Servers option from the menu

  • Click on Refresh to see the target servers for deployment

  • Once you have configured the target servers, you can deploy the application from the workbench UI by clicking on Deploy to servers from the menu
  • Choose your build, package name and target server details to deploy the application from the workbench

  • Click on start to start the deployment process


Sunday, March 30, 2014

Microsoft ALM - Configure agent settings

While creating a build agent in the TFS admin console, you can define the agent name and the tags using the Team Foundation Administration Console and edit the agent properties as shown below.


You can also do this from inside Visual Studio by right-clicking the Builds node in Team Explorer, choosing Manage Build Controllers, and double-clicking a particular agent.

The “Agent Settings” section under “Advanced” section in the Process tab of the build definition can be used to influence agent reservation during the build process.  Under that section, you can specify which agent should run a build for that definition.  The property is “Name Filter” and it has an asterisk by default, which means that any available agent should be used, you can change that to any of the agents on the drop-down list”.   This will ensure that only the selected agent will get picked for that build. You can also redirect specialized builds to specialized build agents by tweaking the build agent reservation properties of the default build process template.


When we schedule a build, we can define an agent name filter, a set of tags and a tag matching criteria. This controls the way the Team Foundation Build Controller selects and reserves a Team Foundation Build Agent to perform our build.


Microsoft ALM - Configure Diagnostic logging in builds

TFS logs all builds to file using diagnostic verbosity by default.
Team Foundation Build provides tools to help you debug and resolve problems such as:
  • Failed or partially successful builds
  • Exceptions, errors, or warnings
  • Unexpected events or results

View logs are enabled after the Staging location is configured for your build defintion. If you do not configure your build to produce output (Staging location) then the Diagnostics – View Logs menu will be disabled


After build completion, you can see the logs from the Diagnostics menu.


You can configure the level of logging verbosity from the Process tab of the build defintion. Change the logging level to verbose to explore and diagnose build failures


Saturday, March 29, 2014

Microsoft ALM - Configure gated check-in

The Gated Check-in  builds help teams prevent broken builds by not automatically committing pending changes to the repository, but the system will instead create a separate shelveset that will be picked up by the Gated Check-in Build. The build itself will finally decide if the pending changes need to be committed to the repository based on the applied quality gates. In large teams, the main branch is normally gated and DEV/ feature branches are gate to offer more protection for the branch.
A gated check-in means that a build is performed with one set of changes from one developer and if that passes those changes are checked-in. This means that breaking changes never get it into the code base and it limits the pain to the developer checking-in rather than sharing that pain with the entire team when somebody makes a mistake.
Setting up a gated check in
  1. In Team Explorer, make sure you are connected to the team project and then open the Builds page.
  2. Choose the New Build Definition link or select a build, open its shortcut menu
  3. Choose Edit Build Definition.
  4. On the Trigger tab: Choose Gated Check-in.


When a user check-ins some code, Visual studio prompts for validating the build.


On selecting the Build Changes option, the team explorer window shows the status of build validation.


On successful build, TFS prompts the user the status of the check-in


Clicking the “Reconcile …” button will force an undo in the local workspace and pull the changes that were committed by the Gated Check-in build

Thursday, November 7, 2013

Bringing Agile into SharePoint - ALM


SharePoint development platform, provides the capabilities to develop, deploy, and update customizations and custom functionalities for the SharePoint sites. The activities that take advantage of these capabilities all fall under the category of Application Lifecycle Management (ALM).

“ALM is a continuous process of managing the life of an application through governance, development and maintenance.”

With the options like BCS, Client OM, Sandbox solutions, WCF based Service Applications and Claims based authentication SharePoint has also significantly evolved as application development platform which opens up a number of extensibility options for the developers. With the power and flexibility to use these tools and customizations the question arises is how to effectively and efficiently manage the activities taking into account the lifecycle of application starting from requirement gathering to release management with consistent quality.

The entire process involves setting up SharePoint with visual studio, TFS, Build automation, Deployment and automated testing.

Setting up DEV environment
To take the full advantage of development capabilities, SharePoint is installed on all development machines. We use scripted installation of SharePoint (SPAutoInsaller) which helps to maintain a similar environment for all development machines and helps the team to configure SharePoint easily.

TFS as a source control

With Visual studio as a development tool, the integration to source control is much easier as the IDE is easily integrated to the TFS. The team creates and works on team projects, checks in the code directly from Visual Studio to TFS.

TFS for build automation
CI builds are configured to ensure that every code that is checked in passes the build with the configured build standards. On every code check-in the build server to pull down the latest source code, compile the code, run any static analysis rules, executes all unit tests and integration tests on the latest code and report any errors along the way. This is a great way of ensuring that even if the developers locally don’t run the static analysis rules or unit tests they will be run here and also ensures that all source code is checked in and is working as expected.


TFS for Code analysis
Code analysis rules help teams to ensure that coding is done according to the standards defined and are followed without fail. The default set of rules are built into Visual Studio which can also be tweaked to meet the specific needs of the teams. Apart from the built in rules which are common to all projects, additional rules like SPDisposeCheck that analyzes the code to see whether all SPWeb and SPSite objects are disposed correctly can be added to the rules. These rules are run on both Visual Studio and TFS to ensure continuous quality.

Automated deployment
Automated deployment is triggered as part of the build process, or as an unattended service to deploy solution packages. The deployment process is a combination of batch files, PowerShell commands and xml configuration files. It is a great way to update the test machines with latest version of the software every time a new version is checked in.

Automated unit, smoke and regression testing
Testing is also configured as part of the CI build process or a nightly build process depending on the teams requirements. Most of the unit tests are executed on every check-in build and regression tests are executed as part of the nightly builds. Team focuses on creating and maintaining a clean set of test cases that help the team get an early feedback on the quality of the product after every release to the test environment.